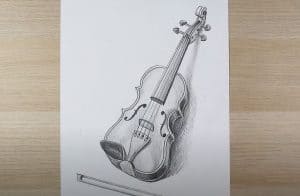
Violin Drawing easy with this how-to video and step-by-step drawing instructions. How to draw step by step for beginners and everyone.

Please see the drawing tutorial in the video below
You can refer to the simple step-by-step drawing guide below
Step 1
In this first step of the violin tutorial, we won’t actually draw the violin itself. Instead, we’ll draw the bow used on the strings to create the notes.
When drawing this bow, you will definitely want to use a ruler to make your life a lot easier. Using your ruler, draw two thin lines very close to each other.
Then there will be a small metal section that you can add to the bottom end of the bow.
Step 2 – Next we can finish the bow
We will perfect the bow in your violin drawing step. You will definitely want to keep this ruler in your hand!
To start, add three very thin sections to the top end of the bow from the last step.
You can then use a ruler to draw the thicker string of the bow extending from this part to the part you drew at the bottom of the bow.
Once this bow is complete, we can finally start drawing the outline of the violin itself in the next step, so let’s move on!
Step 3 – Draw the outline for the violin
In this third step of the violin tutorial, we’ll begin to outline the body of the violin.
This can be a complicated step, so you may want to take it slow and keep a close eye on the reference image as you draw.
The top of the violin will be quite round, and then there will be an oval part extending into the violin.
The body will then stretch outward and then inward for the rounded base of the violin. Once you’ve drawn the first half of the stem of this violin, simply mirror exactly what you just did on the other side.
If any of this sounds a bit complicated, just make sure to copy exactly what you see in the reference image and you’re good to go!
There will also be a circle added near the bottom of the violin for the part where your shoulders will be.
Step 4 – Now, start drawing the neck and strings
Using your ruler again, draw two lines up from the body of the violin for the neck of the instrument.
Then we’ll draw some short, straight lines with some circles at their ends for the adjustment pins at the end of the neck.
You can then finish this step by drawing a small, very thin shape near the bottom of the violin and then some curves for a triangle-like shape there.
Once these aspects have been drawn, draw another line close to the inner circumference of the contour and then we can move on to the next step!
Step 5 – Finish your violin drawing
You’ll want to take out the ruler one last time for this step of our violin tutorial. We will add four lines through the center of the violin for these strings.
You can then draw some little dotted shapes over the triangle-like shape you drew earlier to indicate where the wires will connect.
Then we’ll finish by drawing a symbol on either side of the wire. It will look a bit like a fancy F on one side and a fancy F on the other side.
After adding this last detail, you are ready for the final step! You can also paint the background with some other instrument or you can add some musical notes for a more stylish background.
These are just a few ideas, but feel free to get creative and use some of your own!
Step 6 – Finish your violin drawing with some color
Now we will finish your beautiful violin painting with some color. We used some very light browns for the wood parts of the violin, and then we used some darker grays for the neck.
These are the colors we used, but this is your drawing and you should definitely add any colors or shades that you love!
You can also have a great time with your art tools and media, as this is a great way to get some additional color variation. We can’t wait to see what you end up doing!


