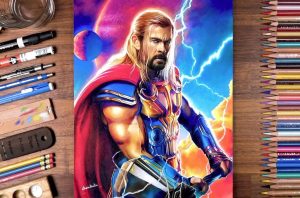
How to draw Thor Odinson Realistic with this how-to video and step-by-step drawing instructions. Celebrity drawings for beginners and everyone.

Please see the drawing tutorial in the video below
– Colored pencil : Prismacolor Premire, Derwent Lightfast.
– Paper : Saunders Waterford.
Thor Odinson Drawing Step by Step
Step 1 Draw the basic shapes:
Start with a gentle outline of basic shapes to establish the proportions of Thor’s head, facial features, and body. Use blurred lines and simple shapes to roughen your drawing.
Step 2 Outline features:
Begin to refine the contours of Thor’s face, hair, and other distinctive features. Pay attention to the lines and shapes of his facial features, including his eyes, nose, mouth, and jawline.
Step 3 Add Shadows:
Start adding shadows to your drawing. See reference image for highlights and shadows. Use lighter pencil layers (H) for the lighter areas and gradually move to darker layers (B) for the shadow areas. Use smooth, controlled strokes to build values.
Step 4 Focus on the details:
As you progress, add finer details to Thor’s face and hair. Pay attention to the little nuances that make him recognizable, such as his beard, eyebrows, and any scars or marks on his face.
Step 5 Eyes and expressions:
The eyes are an important element in achieving realism. Focus on capturing the expression in Thor’s eyes. Use subtle shadows and blends to bring depth and life to the eyes.
Step 6 Hair and texture:
Thor’s hair can come in a variety of textures and thicknesses. Use different pencil strokes to depict different hairs. Use techniques like cross-drawing and dot-painting to achieve realistic hair texture.
Step 7 Clothing and accessories:
If your reference image includes Thor’s costume or any accessories, deal with those accessories next. Pay attention to folds, creases, and fabric textures.
Step 8 Refine the face:
Spend some time fine-tuning the details of Thor’s face, making sure his lines are precise and balanced. Use a kneaded eraser to gently remove highlights and create subtle gradations in skin tones.
Step 9 Context (Optional):
Decide if you want to add a background to your drawing. If so, choose a background that complements your subject and doesn’t distract from the main focus.
Step 10 Final steps:
Take a step back and evaluate your entire drawing. Make any necessary adjustments to value, contrast, and detail. Use eraser and pencil to refine highlights and shadows.
Step 11 Fixation Spray (Optional):
If you want to preserve your drawings and prevent smudges, consider using a fixative spray as directed on the product.


