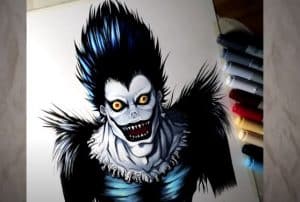
How To Draw Ryuk From Death Note with this how-to video and step-by-step drawing instructions. Easy drawing tutorial for beginners and everyone.

Please see Ryuk drawing tutorial in the video below
Hey guys! For today’s tutorial, I will show you how to draw Ryuk from Death Note. If you’re not familiar with Death Note, it’s a super popular manga and anime series, and it even got its own Netflix adaptation. Ryuk happens to be one of my all-time favorite anime characters, so I’ve enjoyed working on this guide. So without further introduction, let’s learn how to draw Ryuk from Death Note!
You can refer to the Ryuk step-by-step drawing guide below
Step 1
To start Ryuk, we will first draw an oval with two dividing lines that will become the base for Ryuk’s head.
Step 2
Starting from the midline (where the arrow is pointing), we’ll draw a long zigzag line through the bottom of Ryuk’s head, which will become his upper lip.
Step 3
Next, draw another line below the top lip to form Ryuk’s bottom lip. Also, draw some sharp triangular teeth to complete Ryuk’s mouth.
Step 4
Next, we need to draw a line from Ryuk’s lower lip, up to the edge of his head. This will give Ryuk a lower jaw. Also, draw another oval where Ryuk’s jaw comes in contact with his head to form his ears.
Step 5
We’ll do all the rest of Ryuk’s facial features in one step. giving him big round eyes with a curve on each eye for his brow bone. Also, draw Ryuk’s skeleton-like nose right in the center of his face as shown in the image for this step.
Step 6
To complete Ryuk’s eyes, draw a jagged line around each eye that roughly resembles the shape of a flame.
Step 7
Now let’s go back to Ryuk’s ear and draw some doodles for the ear detail. Ryuk also has a signature heart earring that hangs over one of his ears as you can see in the photo.
Step 8
Now that Ryuk’s face is basically done, we can start working on his hair. Ryuk has very spiky high hair, so we’ll need to draw some jagged lines on the top of his skull extending past the top of his head.
Step 9
Now we’ll finish off the rest of Ryuk’s hair by adding some spikes pointing upwards almost creating the illusion of flames.
Step 10
Ryuk’s collar is very different as it looks like his shirt is actually sewn to his body. To do this we will need to draw a jagged line in a circle around his head. Also, draw a few small ovals to create the stitches.
Step 11
Next, we’ll draw some long spikes on Ryuk’s shoulder. They are for decoration only, and are almost like feathers.
Step 12
This step looks like a lot, but it really isn’t too bad! To finish Ryuk we need to draw some contours on his face and around his neck as shown in the image.
Step 13
Now to finish Ryuk we’ll give him some color, and that’s it! Ryuk traditionally has more black and white, but I used some purple tones to give the image a slightly more interesting look. Thank you for watching this tutorial on how to draw Ryuk from Death Note. And as always, happy drawing!


