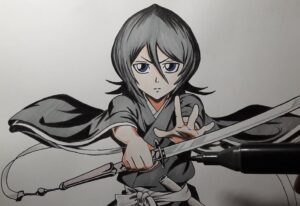
How to Draw Rukia (anime boy) with this how-to video and step by step drawing instructions. Anime drawing tutorial for beginners and everyone.

Please see Rukia drawing tutorial in the video below
Rukia Drawing Step by Step
Step 1
OK, first of all we will start this step with the basic framework of Rukia. This means drawing V-shaped necklines at the neckline. This will be the area where the two pieces of fabric meet. Also draw the starting line of the sword near Rukia’s right arm. Once you’re done with that, sketch out the guide at the bottom of her Shinigami cape. Draw two lines at the end of her cape. They will be defined as feet. Never forget to draw a large circle with face lines at the top of the neck. That will be the head.
Step 2
Now, we will draw more details about Shinigami Rukia. Add some wrinkles on her clothes as well as the contours of her face. Her eyes are like square lemons. Once you’re done with that, start drawing the details of her hands and feet. In this case, we’ll start by drawing the base lining of the foot. Add great details to the center of Rukia’s cape. This means pulling the wrap where the cloak is closed.
Step 3
Ok now we will start this step by adding more wrinkles on the lower part of the Shinigami robe. This step also includes drawing the rest of the foot. What I love about drawing Bleach characters is that they wear ninja sandals. This means you don’t actually have to draw the toes XD. Unlike the characters in Naruto, I have to REMOVE their toes. I’m not really good with my feet. Either way, tie a tight knot in the middle of the cape. I love drawing this part because it’s so much fun. Don’t forget to draw some swords and faces. By the way, Rukia’s sword is in its scabbard ^_^.
Step 4
Finally, this is where we end the rest of Rukia! I bet you can’t wait because you’re probably exhausted from drawing hard stuff. In this step we will draw the rest of the wrinkles on the clothes as well as the rest of the ninja sandals. After you finish Rukia’s face! Don’t forget to add the details of the sword too. Ready for line art??
Step 5
Well, my peek, this is Rukia’s line art. This is what she will look like after you complete those steps. I know the first part of the tutorial is challenging. With practice, you will definitely get the results of this! I really hope your tutorial helped on how to draw Rukia Kuchiki from Bleach! Comment, rate and favorite if you think this guide is worth your time!


