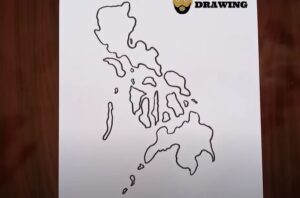
How to draw Philippines (map) with this how-to video and step by step drawing instructions. Easy map drawing tutorial for children and everyone.

Please see Philippines drawing tutorial in the video below
You can refer to Philippines simple step by step drawing guide below
Step 1. Start with an Outline:
Begin by drawing a rough outline of the shape of the Philippines. The Philippines is an archipelago composed of numerous islands, so you’ll be drawing a series of irregular shapes.
Focus on the main islands: Luzon, Visayas, and Mindanao. Luzon is the largest island and is located in the northern part of the Philippines. Visayas is a group of islands located in the central part, and Mindanao is the southernmost major island.
Sketch the general shapes of these islands on your paper. Keep in mind the proportions and relative sizes.
Step 2. Add More Detail:
Once you have the basic outline, start adding more detail. Add smaller islands around the main ones, such as Palawan, Samar, Leyte, and others.
Draw the coastal outlines of each island, making them jagged to represent the natural coastline.
Draw major geographical features like mountain ranges, rivers, and lakes. The Cordillera Central mountain range on Luzon and the Sierra Madre range along the eastern coast are significant features.
You can use a reference map of the Philippines to guide you in placing these features accurately.
Step 3. Label Major Cities and Landmarks:
Mark the locations of major cities such as Manila (the capital), Cebu City, Davao City, and others. These cities are typically located on the coasts.
Label other important landmarks such as the Taal Volcano, Mount Mayon, and other notable natural or man-made features.
Step 4. Add Additional Details:
Include other features like national parks, airports, and seaports if desired.
You can also add a compass rose to indicate direction if you’d like.
Step 5. Finalize with Ink (Optional):
Once you’re satisfied with your pencil drawing, you can go over the lines with a black marker or pen to make them stand out more.
Allow the ink to dry completely before erasing any pencil lines.
Step 6. Coloring (Optional):
If you want to add color to your map, use colored pencils or markers to fill in the different regions. Use blue for the water, green for land areas, and different colors for cities and other features.
You can also use shading to indicate elevation, with darker shades for higher elevations and lighter shades for lower elevations.
Step 7. Final Touches:
Once your map is complete, take a moment to review it and make any final adjustments or corrections.
Sign and date your map to mark the occasion!
That’s it! You’ve successfully drawn a map of the Philippines. Enjoy exploring the geography and landmarks of this beautiful country through your creation.


