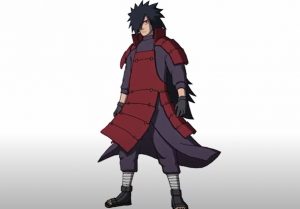
How to Draw Madara from Naruto easy with this how-to video and step-by-step drawing instructions. Cartoon drawing tutorials for beginners and kids.

Please see the drawing tutorial in the video below
You can refer to the simple step-by-step drawing guide below
Step 1
Let’s start with the circle for his head ad, then add facial guidelines. You’ll then draw a simple outline that will help you draw Madara’s body in more detail.
Step 2
This step is all about drawing the big hairs and looks like you see here. Madara has more hair on the left, then on the right. Once done, you can draw the back of his collar, and then the right shoulder.
Step 3
Sketch his face and then his head protector. Next, draw the sleeve design on his shirt and then draw the left hand. To finish off this step, all you have to do is draw a sharp looking ponytail that is noticeable at the back of his body.
Step 4
Now it’s time to start sketching his square padded outfit. Add horizontal guides to add stroke to the character clothing, then draw lines at the top of the arms and or sleeves.
Step 5
Finish sketching his right hand and arm, then draw the shape or hem of his skirt, and the ends of his long hair. Add some twists on his thighs, and then move on to the next drawing step.
Step 6
Now, start outlining his legs and/or pants, then draw the cross cloth wrapped around his shins. You are almost done with this tutorial, all you have to do is move on to the final drawing step.
Step 7
Now that you’re done, all you have to do is outline his feet and shoes as you see here. Make sure you add details and strokes to his legs, shoes, and clothes. Erase all the guides and shapes that you drew in step one to clean up the drawing.
Step 8
This is what Madara will look like when you’re done. Color him and that should do it now. I hope you enjoyed this tutorial that taught you how to draw one of Naruto’s most infamous characters.


