How To Draw Lungs easy with this how-to video and step-by-step drawing instructions. Easy drawing tutorial for beginners and everyone.

Please see the drawing tutorial in the video below
You can refer to the simple step-by-step drawing guide below
Step 1
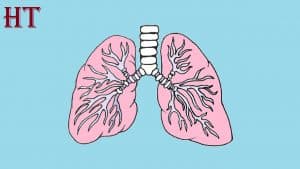
In the first step of the lung drawing tutorial, we will draw the central structure of the lung, called the trachea.
This organ, also known as the trachea, is a tube-like structure that carries air to the lungs. Had a rather curious look at this structure, and it almost resembles a string of ribbed pipes.
It will look like an upside down Y shape and will be drawn with lots of smaller shapes connected together.
You can draw several short, round shapes that form the top pipe of that Y, and each of these shapes will be connected by small lines.
It will then branch diagonally with those little shapes and lines.
These branching shapes are the left and right bronchi, and they are also important for the lungs. After you’ve copied the drawing as it appears in our reference image, you’re ready for step 2!
Step 2 – Next, draw the first lung
Now that you have the trachea and bronchi, you can now draw your first lung. This first lung will go to the left, and there will be a large circular border going around the left bronchus. The border will be uneven and look rather bumpy and irregular.
You can finish this step by drawing some detailed curves into the inside of the lung from the ends of the bronchi. That’s all it takes, so start step 3 now!
Step 3 – Draw some veins on the lungs
In this third step of the lung drawing tutorial, we will draw some thick veins on the lung that you just drew.
These veins are called lobes, and they will be drawn with a number of curves that culminate in sharp points at the ends.
There will be quite a few arms sticking out of these lobe ‘trees’ and they will fill a large portion of the inside of the lung. After they are drawn, we will start at the second lung in the next step.
Step 4 – Next, draw some more veins for the remaining lung
To shake things up, we’ll treat the second lung in the reverse order of the first lung!
For this part of your lung drawing, we’ll start with the lobes on the right hand side instead of starting with the lung outline like we did earlier.
Other than the change in order of execution, these lobes will look very similar to the first batch you did.
That means they will be pointed ‘trees’ that take up most of the interior of the lung that we’ll be drawing soon.
Then it’s time for some final details in the next step, you’re ready for some color to finish it off!
Step 5 – Complete your lung drawing
Now it’s time to finish drawing for this step of our lung tutorial. To do this, you will draw the outline of the lung on the right hand side.
Again, this will mirror how it appears on the left side and it should look pretty similar to that one. So you have finished your lung drawing!
However, there are a few ways that you can take this drawing further. You can look up some more medical diagrams and draw some organs around these lungs to get an idea.
Another idea is to look for a labeled diagram of several lungs and then label your own drawing.
These are just some of the ideas you can use to make this drawing a reality, but be sure to include any more ideas you might have for it!
Step 6 – Complete your lung drawing with some colors
Your lung drawing is now complete and the final step will be to finish it off with some color! In our reference image, we showed you how we chose the color in the lung with a focus on realism.
We used brown and beige for the trachea and bronchi, while using a softer pink for the inside of the lungs.
Finally, we finished with a darker purple for the veined lobes. These are the colors we chose for our drawing, but you can also change the colors for your own drawing any way you like.
Once your colors have been chosen, you can also have fun choosing what artistic medium you will use to achieve them. How would you complete this lung painting with some amazing colors?


