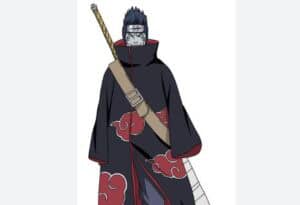
How to Draw Kisame from Naruto with this how-to video and step by step drawing instructions. Anime drawing tutorial for beginners and all.

Please see Kisame from Naruto drawing tutorial in the video below
Kisame Drawing Step by Step
Step 1
The first step is very easy. All you have to do is draw a circle for his head, add paths on his face, then draw an oblong bell for his body or cape. Added instructions for the legs and weapons he has on his back.
Step 2
Start sketching his face including hood frame, eye shape and then mouth.
Step 3
Complete the outline of the eyes, mouth and add the nose. You’ll also draw a hood with a frame that shows the head guard as well as his long spiky hair falling off the top of the head mask. Next, draw a bowl-shaped collar for his cape, then draw the shoulders and handles for his weapon which is the woven lining.
Step 4
Continue to draw his robe like long sleeves. Sleeves should look baggy and should also have a strap across the chest. Add a few clouds, and then add some more.
Step 5
Finish drawing the rest of his cape and then draw a few more cloud patterns. Next, start the process of drawing the legs, and then for the cape, open the right side as seen here.
Step 6
For the final drawing step, all you need to do is draw the rest of his legs, then draw his feet. Add some more creases and wrinkles and they start erasing all the paths and shapes that you drew in step one.
Step 7
This is how Kisame will look when you’re done. Color him, and then you’ve just finished drawing another Naruto character. Did I have fun? Join me again for a fun filled lesson.


