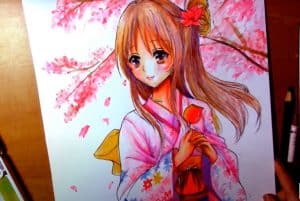
How to draw japan anime girl with this how-to video and step-by-step drawing instructions. Anime drawing for beginners and eveyone.

Please see the drawing tutorial in the video below
You can refer to the simple step-by-step drawing guide below
Step 1
We are taking shortcuts in the tutorial. Draw a circle with intersecting lines for the eyes and nose. Long talk for her neck. Now outline the shoulder, torso and hip shapes. Sketch with the #2 pencil. Remember to make it easy to erase.
Step 2
You’ll need to click on the picture to see where to draw the little lines and spikes for her hair. Take a close look and see where her eyebrows, eyes, and jawline appear. Step 6 shows the fan covering her mouth and chin.
Step 3
Sketch her bangs and hair. Draw gently please.
Step 4
Now sketch on the other side of her hair. See how they relate to principles.
Step 5
Take your time while drawing this picture because in this step you need to pay attention to how her hair is gathered into a ponytail. Remember how the top and back of her head relate to the principles. Make sure you don’t forget her collar, shoulders, and wrinkles near her shoulders.
Step 6
I thought this girl could lend me some of her hair. Watch it flow! Here’s the fan that covers her mouth, hands, sleeves, and hair band. Go ahead and draw this part.
Step 7
At this point, draw her Kimono waistband and sleeves.
Step 8
Last but not least is drawing the bow tie and swirls in her hair. You can now delete the guidelines if you haven’t already.
Step 9
Your drawing can look like this, or you can have your own version. At this point, you can color in your picture with a medium of your choice.
Step 10
This is the basic color combination of the Anime girl. Following this step are tips on sketching/drawing an anime girl.
Step 11
It’s great to learn the different positions of the head for a good drawing. I noticed the top of the anime head is much larger and the lower part of the face is almost a third of the head size. Last but not least, the nose is barely noticeable and the chin is pointed. This is the basic form of anime.
Step 12
In a more realistic eye, there are ways of drawing right and wrong. But if you look closely, you can see those key rules still hold with most anime drawings. (1) Draw the outline of the eye at an angle. Do not hook the tear duct into the eye. (2) The iris is slightly covered by the upper eyelid. Do not draw the full round iris inside the eye. (3) There is always a pink fleshy membrane near the white of the eye (sclera). That is why the iris is like floating on the membrane, not touching the tip of the lower lid. Do not draw the iris touching the bottom cover. (4) Normal eye catchers have a point near the top and bottom. They are located at a 180 degree angle. The top light is larger than the bottom light. OTHER TIP: SCLERA does not have white in the eyes. It has a light gray color because the eye is sunken into the socket. Also, the upper eyelid causes shadows on the iris. And the highlight in the iris is never at the tip of the top cap.
Step 13
Here are some different expressions of women’s eyes in this step. Try drawing them and see how fun it feels to have that certain emotion. Also pay attention to the position of the eyelashes and the shape of the eye. Don’t forget to add flash, very popular anime series.
Step 14
The body height of female anime is generally about 7 heads. The head is pointed, the eyes are large, the nose is very small, and the mouth is round or oval when opened. This photo gives us a 180 degree view of the female figure.
Step 15
This is an interesting identification of female body types. Adding personality to a girl can be BANANA (thin), APPLE (wider at the top), PEAR (wider at the hips), HOURGLASS (curvy or well-shaped – bust equals hips, has a very slim waist ) .
Step 16
You can sketch your own anime girl, show her personality and impression using those basic body shapes. Here are some interesting body types of these characters. Do you recognize them?
Step 17
Without light, we have a flat subject. The overhead lighting is what makes our Anime Girl so interesting. The red arrows are the direction of the light. The blue arrows are shadows created by her hair, hands, arms, and folds on her Kimono. Here are three common light sources that help to bring out certain effects on the face. DRAMATIC is created by overhead light. This could be midday sun or strong moonlight. MYSTERIOUS is created when light shines above or below the face like holding a candle or flashlight. You will see this effect used a lot in graphic novels or noir novels. CONVENTIONAL is the most common. It is created at a 45 degree angle of light placed to the side, above the subject and slightly forward.
Step 18
Last but not least, I want to show you how great a pencil is. And you can get these same effects with a regular No. 2 pencil. The first picture shows how to hold your pencil for Overhand (great for writing & details) and Underhand (great for shading large areas in wide strokes). You can practice tone shading and take it a step further with the Tone Exercise. I’m closing now. Let me know what you think of this tutorial. I love hearing from you. Fav, comment, or click on “Love it,” to show your support! Luv and hugs to you all!


