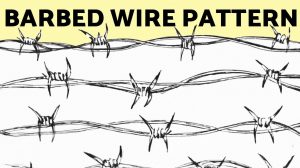
How to Draw Barbed Wire easy with this how-to video and step-by-step drawing instructions. Easy drawing tutorial for beginners and everyone.

Please see the drawing tutorial in the video below
You can refer to the simple step-by-step drawing guide below
Step 1
In the first step of our tutorial on how to draw barbed wire, we’ll draw some curves that may not look like they at first, but will later form an important part of the drawing.
For this step, you’ll want to refer very carefully to the reference image as you draw, as what we’re drawing now will interact very specifically with future steps.
You may also want to draw with a pencil first and then write again with a pen when you’re happy with how it looks. Once you’ve drawn the lines as they appear in the reference image, you’re ready for the next step!
Step 2 – Add some more curves to the wire
It’s no secret that a barbed wire fence is made up of zigzag wires as the name implies and with the lines we will draw in this part of your barbed wire drawing we will add some wire again.
These lines will be similar to the ones in the previous step, and they will interact in a specific way to look like zigzag ropes.
Once you’re happy with the look, you’re ready for the third step!
Step 3 – Next you can start drawing the spikes of the barbed wire
Barbed wire wouldn’t be very useful without some spikes, so we’ll start drawing them in this section of our how to draw barbed wire tutorial.
To do this you will use some sharp and angled lines ending in sharp points for the spikes. The lines will also curve in a way that looks like they’re twisting into each other.
This spiky part looks confusing, but it’s easier than you think when you take your shot slowly and closely follow the reference image.
Step 4 – Draw some more wires and spikes
So far, you’re doing a great job drawing this barbed wire! You’ve made it to this point, so you should have no problem going through the rest of this tutorial.
In this part we will add more lines to the rope and spikes. Simply use some more wavy lines for the crossbar as you have done so far.
Then we’ll add two more spikes. For now, this cluster of spikes will be a little different from the one you drew in the previous step.
However, we’ll be adding more information about it in the next step, so when you’re happy with how it looks you’re ready for some final details in step 5!
Step 5 – Now you can add some final details to your barbed wire drawing
Soon it’ll be time to add some color to your drawing in this barbed wire drawing tutorial, but first, we have some final details to add.
As we mentioned in the last step, we will finish the spike assembly you started with in part 4. Using some more curves ending in the spikes you can finish the twisted ropes and sharp protrusion of barbed wire.
With the final details and spikes added, that means you’ve finished all the details for this painting! Before continuing, you can also add some details of your own.
You can draw more rows of barbed wire below this row, or you can draw a majestic sign below the row of wire to show what it is protecting.
These are just a few ideas, but what else can you think of to finish this barbed wire drawing before the final step?
Step 6 – Finish your barbed wire drawing with some colors
That brings you to the final step of drawing the barbed wire. This step will see you add some color to your painting to really complete it. In our reference image, we used several variations of different shades of gray to give the wire a metallic look.
This can be a reference point if you want a similar look to your photo, but there are ways you can bring your own favorite color to this photo.
If you’ve painted the background or added any elements it’s a great way to add color to this picture.
You can also create a more stylish look and use some bright and vibrant colors to complete it. What color and favorite art medium will you use to close this barbed wire drawing of yours?


