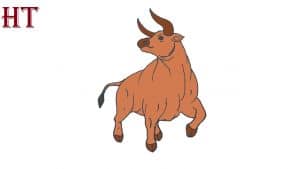
How To Draw An Ox easy with this how-to video and step-by-step drawing instructions. Easy animals to draw for beginners and kids.
Please see the drawing tutorial in the video below
You can refer to the simple step-by-step drawing guide below
Step 1
In the first step of the tutorial on how to draw a cow, we will start with the animal’s head and horns.
First, use some circles for the top of the muzzle and the bottom of the mouth, as shown in the reference image. Then we’ll use some more rounded lines for the top of the cow’s head.
Then, using some wavy lines, we’ll draw wavy horns on the top of the head and finish off with some spikes.
Finally, draw some small round ears on either side of the head to complete the part.
Then we should be able to move on to step 2 of this tutorial!
Step 2 – Now draw some details on the face and the beginning of the neck and body
To continue this drawing of the bull, we will now add some more details on the face along with the neck and torso of this mighty bull!
First, add a large black dot on the nose for the nostrils. Once you’ve drawn, you can add a small circle with a dot inside for the eyes.
Next, draw a curved line inside the ear to show the inside.
Then we’ll use some more curves for elements like the cow’s jaw, neck, and shoulders.
As mentioned, the bull is strong and muscular, so for that reason we will use a lot of smooth, rounded lines. When you’re happy with how it looks, it’s time for step 3.
Step 3 – Draw some more cows
This third step of our tutorial on how to draw a cow will focus on adding some contour to the body.
More specifically, we will focus on the back and front legs of the cow. For the back, use a seam that connects to the neck and then leans sharply downwards.
You can then add a small wavy tail to the latter part.
We will also draw the starting point of the front leg in this step, and this will be drawn with some curved lines connecting to the chest.
We’ll finish drawing one leg and the other as we move on to the next few steps.
Step 4 – Next, draw the first hind leg and the starting point of the belly
You added the starting point of the first previous turn in the previous step, and in this step we will draw the starting point of the first following turn.
Using some more curves for the thick upper part of the hind foot, you can then draw the back half of the leg thinner, straighter with the hoof at the end.
Then draw some simple curves for the belly, and you can also insert the rounded top of the remaining front leg.
Once these aspects are drawn, we will move on to the final details in the next step of the tutorial.
Step 5 – Add the final details to your cow drawing
You are now ready to complete the final details and elements of this tutorial on how to draw a cow! The main thing to do will be to finish drawing the legs.
Many of these will be at different angles, but all share the fact that they are thicker on the top half and thinner on the bottom half.
After they are drawn like in our reference image, you can add some more curves to the chest to make the cow look even more muscular!
Once you’ve finished the outline, you can also add some details of your own! They can include the background or maybe some smaller brushstrokes, so how would you complete this picture?
Step 6 – Finish your cow drawing with color
It’s time to take the final step of this cow drawing, and in that part we’ll finish it off with some color!
Cows aren’t the most brightly colored animals, and we took a more realistic, non-dumb approach in our reference image. We used various shades of brown when coloring this cow.
By using a mixture of light and dark shades, you can help further enhance the cow’s muscular character.
Will you choose a similar set of colors for this cow, or will you use completely unique colors and techniques to complete it?
Your Ox drawing is done!
You have completed all 6 steps of this cow drawing tutorial, and you really did a great job with it!
This visual is pretty detailed and specific, so we tried to make sure it stays fun and easy by breaking it down into smaller work-around steps.
Once you complete the steps in our tutorial, you can continue the fun by adding your own details and fun elements.
We talked about adding a background or some smaller details, so what do you think would work for this image?
If you had fun drawing this awesome cow during the tutorial, you can visit our website for more awesome drawing tutorials to enjoy! We upload new ones regularly, so be sure to keep subscribing.
To show off your finished cow drawing, you can share it on our Facebook and Pinterest pages for us to enjoy!
