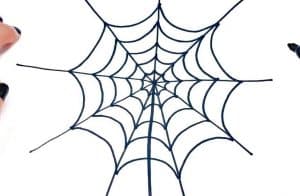
How to Draw A Spiderweb easy with this how-to video and step-by-step drawing instructions. Simple drawing for kids and everyone.

Please see the drawing tutorial in the video below
You can refer to the simple step-by-step drawing guide below
Step 1
Spider webs are a wonder of nature, and they have an incredibly delicate and intricate design to them. That makes them a wonder worth seeing, but can make them a little difficult to draw.
To make this easier, you can use a ruler to draw lines and shapes that will help you. Using the reference image as a guide, we’ll draw a star-like shape using four intersecting lines.
You can go ahead and use a pen for this step, as these lines will end up in the final image.
Don’t worry if you can’t get the angles of your spider web drawing exactly the same as the angles in the reference image!
Step 2 – Draw more guide lines
For the next few steps of this spider web tutorial, you should switch to a lighter pencil to draw the lines, as they won’t show up in the final image.
We’ll be sure to let you know when you should start using your pen again! Now use your pencil to join the ends of each line.
This will leave you with an octagonal shape like the one in our reference image.
Step 3 – Now draw more pencil lines for the interior
We will continue to use a lighter pencil for this part of your web drawing. If you think of your octagon as a cake, we’ll draw three lines in each of its “slices”.
If you want to make it a bit more consistent, try to draw the lines into a slice and then measure the distance between each line.
Then use these measurements for each of the other slices to make sure they all connect evenly.
This may take some time and patience, but it will be well worth it as you will have a super neat and even cobweb!
Step 4 – Start drawing the final details
You can start using the pen again for this step of our spider web tutorial. This is the step where all your preparation will pay off!
If you look at a real spider’s web, you’ll see that the connecting threads are rarely perfectly straight and have a slight droop. We will draw these lines now.
Using the lines that you drew in each slice of the shape, use the pen to draw a very slightly curved line over each line in the slice.
The curve should start and end at the same point as the line, but with a slight curve in the middle. You can also add similar curves to the outer lines of the shape!
Step 5 – Erase all your pencil lines
Now that you’ve drawn over the pencil paths with your pen, you’re ready to start erasing the pencil lines in your spider web drawing!
Before you start using the eraser, be sure to let the ink dry completely first. If you start too early, you can easily smudge the ink.
Once you erase all the pencil lines you will end up with a complete spider web just like in our reference image!
Now that your web is completely drawn, you can add some extra details to make it your own. An obvious choice would be to draw a spider sitting on the web!
You can also draw a fun background for it if you’re feeling more creative. It would be really cool if you had a haunted house wallpaper for your spider web, but that’s just one idea out of many! How would you complete your spider web drawing?
Step 6 – Complete your spider web drawing with some colors
That brings us to the final step of the spider web tutorial! You already have a beautiful picture in front of you, but you can make it better with some color to it.
We showed you a way you can color it for our reference image, but you really should let your imagination run wild!
If you’ve drawn in any additional details or background additions, you can have fun coloring those, too!
I’ll be using some watercolor paints to give this spider web a creepier feel, but whatever art medium you choose will look great!


