How to Draw A Compass easy with this how-to video and step-by-step drawing instructions. Simple drawing for kids and everyone.

Please see the drawing tutorial in the video below
You can refer to the simple step-by-step drawing guide below
Step 1
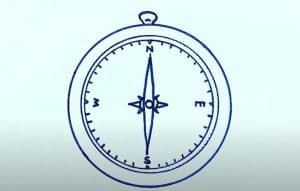
For the first step of the tutorial on how to draw a compass, we will simplify it. All we will do now is draw a perfect circle and this will be the outline of the compass.
There are several ways you can draw a perfect circle. The easiest way is to use a drawing compass (which looks very different from the one you’re drawing now!)
These simple drawing tools make it a lot easier to draw circles with a pen or pencil. You can also detect something round and flat without a compass.
However you choose to draw it, you are ready to continue!
Step 2 – Next, draw some interior details of the compass
For the second step of your compass drawing, we’ll add some more details to the interior of the compass.
For this step, you’ll want to use whatever method you used to draw the compass’s outer circle, as we’ll be drawing some more circles inside it.
To do this, simply draw another circle inside the first shape and close to the outline. Then draw another one inside that one, even closer than before.
Finally, we will add a small circle on top of the compass.
Step 3 – Now, start the side of the compass
The compass wouldn’t be very useful without the directions on the face, so we’ll draw some of those details in this step of the tutorial on how to draw a compass.
First, draw an N at the top of the compass face with a small triangle above it. Then draw a left italic W and a right italic E.
Finally, end with an S at the bottom. Each of these letters will also have a small triangle between them and the outline of the face.
Then, using some circles, you can draw sharp shapes that will form the compass needles, as shown in the reference image.
Then some smaller details can be added around these hands before you move on to step 4.
Step 4 – Next, draw some more details for the face
You have completed the main parts of your compass drawing, so in the next few steps we will add some smaller details.
For this part, we will add many small straight lines to the inner circumference of the compass face.
For now, these lines will only be on the left side, and these lines make navigation more accurate on a real compass.
If you want it to be accurate, you can count how many are in our reference image and try to reproduce it for your own image.
Step 5 – You can now complete the final details of your compass drawing
We’ll finalize the details in this step of the compass drawing tutorial.
This part should be pretty easy, as all you need to do is duplicate what you did in the previous step, just on the other side.
Once you’ve completed these little lines, you’re ready for the final step! However, before you continue, you can also add some highlights of your own.
Perhaps you could draw a fancy string to hang the compass, or you could place it on the map to really end the navigation theme.
You can also draw some engravings on the compass or change some details.
These are just a few details for your reference, so make sure to have fun and experiment as you complete this picture for the final step!
Step 6 – Finish your compass drawing with some colors
The sixth and final step of the compass drawing is the one where you can have some fun adding some color to it!
In our example, we’ve used some more muted gray and red for the compass, but these colors are just a hint.
You can use several shades of gold to make it look like copper, or use a variety of colors to make it look like it’s made of different materials.
You can also vary the art media and tools you use for the compass, as using different media can be a great way to achieve whatever tone you want for your drawing. .
This is your chance to show off your creativity, so we can’t wait to see what colors and mediums you use to complete your amazing drawing!


