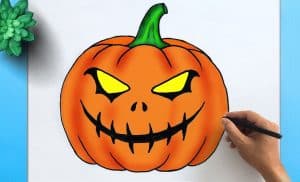
How To Draw A Scary Pumpkin easy with this how-to video and step-by-step drawing instructions. Simple drawing for kids and everyone.

Please see the drawing tutorial in the video below
You can refer to the simple step-by-step drawing guide below
Step 1
We will start this tutorial on how to draw a scary pumpkin by starting the sketch of this vegetable. Pumpkins have short and thick stalks, and this is what we will draw first.
It will have a roughly rounded shape at the end to show where it’s cut off. Then use some more curves from it and add some line details in the middle of it.
Then we will draw the edges of this pumpkin. You can add them using some curved lines going down from the sides of the stalk. Then we can continue to step 2 to add more to this creepy pumpkin!
Step 2 – Now draw the base of this scary pumpkin
In the previous step, we created the edges of this scary pumpkin drawing, and in this second step we will draw the base.
The sides of the pumpkin are drawn in single smooth curves, but the base will look a little different.
The base will be drawn using several interconnected curves. These lines will also extend into the inside of the pumpkin.
The reference image will show you how you can position these curves and then move on to step 3 of the tutorial!
Step 3 – Start drawing details on this scary pumpkin’s face
For the next part of this scary pumpkin tutorial, we’ll start adding facial features along with some other details.
Before we start drawing these facial features, we will first add some details to the base of the trunk.
To do this, extend some curved lines from the base of the trunk and outward, as this will add some depth.
Next, we will draw the eyes of this scary pumpkin. They will be drawn using some rough, jagged lines.
This is to make it look like the eyes were cut with a knife. They will also be tilted down for a more sinister look.
Finally, draw a nose between the eyes using the same jagged lines, and then we can move on to step 4.
Step 4 – Next, draw the mouth for this scary pumpkin
Every venerable lantern has a grin, and we’ll add one to your creepy pumpkin drawing in this fifth step.
This mouth will also be drawn with the same jagged line you used for the nose and eyes, and it will be huge on the face of the scary pumpkin.
After it is drawn as it appears in our reference image, we will add some details to it along with any final strokes in the next step of the tutorial.
Step 5 – Add Final Details to Your Scary Pumpkin Drawing
You are now ready to complete the final details and elements in this step of our how to draw a scary pumpkin tutorial.
In this step, we will mainly focus on adding some depth to the parts that have been cut out. To do this, simply draw some lines running parallel to the inner contour of all the cropped areas.
Add some fine line details and this will help give them a more 3D look.
Once you’ve completed these details, you can add some more of your own! It could be really cool to add a cool Halloween-themed wallpaper.
There are many other Halloween symbols that you can use as a background, and you can also draw some more objects around this scary pumpkin.
What kind of fun spooky details can you think of to finish off this image?
Step 6 – Complete your scary pumpkin drawing with color
For the last step of this scary pumpkin drawing, we’ll finish it off with some color! In our reference image, we have shown you the colors that we will choose for this image.
We used different shades of orange for the outside of the pumpkin, and then we incorporated some yellow for the inner edges that you painted inside the cutout areas.
Then we used some dark brown for the insides to maintain a more mysterious look to the scary pumpkin.
These are the colors we’ve chosen, but you should definitely choose whichever color you think would work best with this spooky image! What colors and art mediums will you use to bring this scary pumpkin to life?
Your scary pumpkin drawing is done!
You’ve completed all 6 steps in this scary pumpkin tutorial and you’ll be so proud of the amazing picture you’ve created!
We’ve tried to make a scary pumpkin pictorial that’s fun and engaging for you to make, and worked hard to make sure it’s fun and easy. .
Now that you’ve finished it, you can continue the fun times by adding your own subtle and personal touches to the picture.
We talked about adding backgrounds or some other Halloween objects and icons, but what else could you think of to complete it?


