How To Draw A Palm Leaf easy with this how-to video and step-by-step drawing instructions. Simple drawing for kids and everyone.

Please see the drawing tutorial in the video below
You can refer to the simple step-by-step drawing guide below
Step 1
When you look at a palm leaf you will see that it is made up of a lot of separate leaves on a large central branch and this can start to make it quite difficult to draw!
For that reason, we’re going to be going pretty slow in this tutorial on how to draw a palm leaf, and we’re going to break it down into smaller steps.
First, draw a small, thin section with a pointed end for the base of the branch.
Then we will start drawing some leaves on this branch. Each of these leaves will be drawn using a number of circles that will form these thin shapes.
Each will also have a pointed end at the end, as shown in our reference image. Then you can continue to step 2 of this tutorial!
Step 2 – Now draw more leaves
You drew the first leaves for this palm leaf drawing in the first step, and now we will draw the next few.
This may not be as easy as you expect, as these next cards will not be the same as the previous ones. Instead, each leaf actually gets a little longer as you go along.
The reference image will show you how it will look and you should do your best to reproduce it, as we are looking for a rather specific overall shape.
There will also be a very small space in between each leaf, as this will form the central branch. After this is drawn you will be ready for step 3!
Step 3 – Draw the next part of the leaf
You are doing great with this how to draw a palm leaf tutorial! In this next step, you will draw another large part of the leaf.
These subsequent leaves will also be quite large, but they will be slightly shorter than the previous leaves.
The central branch will now also be a bit more visible and you can draw it using some lines going down in the center.
That’s all for now and we’ll continue to add more images in the next step of the tutorial.
Step 4 – Next, add another large leaf section
We will be adding another large leaf section to your palm leaf drawing in this fourth step of the tutorial.
We’re getting closer to the tip of the palm leaves now, so all of these leaves will get a little shorter the further you get to the end.
As you can see in our example, the leaf will also start to swing to the right a bit, and this helps make the leaf look like it has a bit more weight.
There will only be one more section to paint in the next step and we will also add any final details or extra accents in that step too!
Step 5 – Add the final details to your palm leaf drawing
Now you’re ready to add the final part in this step of our how to draw a palm leaf tutorial! This will be the tip of the palm leaf, and the further away it goes, the thinner it will be.
Once you’ve completed this final piece, you’ll be ready to add some color in the final step! Before we do that, there are also some final details that you can add in this step.
You can paint the background as a hint, and you can use the lovely tropical background to give this picture a resort feel. What else can you think of to end this image?
Step 6 – Finish your palm leaf drawing with color
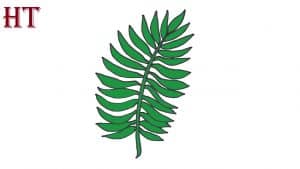
Now you are ready to complete this palm leaf drawing with some color! Palm leaves are famous for their rich green color, and this is what we looked for in our reference image.
We used different shades of dark green to create a lovely texture for the leaf and you can take a similar approach if you like the look!
You can also use any other color you like for the image.
You can use some browns and yellows for a more mature look to this leaf, or you can use your favorite bright colors for a more stylish approach.
What color and art medium will you use for this image?
Your palm leaf drawing is done!
Go to the end of this tutorial on how to draw a palm leaf!
We hope that the steps in this tutorial made drawing fun and easy, although drawings like this may present more complex elements.
Now that you’ve completed all the steps, you can continue with your own fun elements and ideas!
We’ve covered a few ways you can add some background detail, additional elements, and creative color choices, but we can’t wait to see what great ideas you come up with. .
Then, when you’re ready to take on a new drawing challenge, you can visit our website to sample many of the great drawing tutorials we have for you there.
We plan to upload more videos soon, so keep checking!
We’ll also be happy to see your finished palm leaf drawing, so feel free to share your finished piece on our Facebook and Pinterest pages for us to see!


