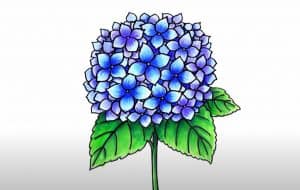
How to Draw a Hydrangea Flower easy with this how-to video and step-by-step drawing instructions. Flower drawing tutorial for beginners and everyone.

Please see the drawing tutorial in the video below
You can refer to the simple step-by-step drawing guide below
Step 1
Start by drawing some small flowers of the hydrangea. For each flower, use curved lines to form four petals in the shape of a four-leaf clover. Notice how the flowers overlap.
Step 2
Draw more flowers, again using curved lines to form each of the four petals. Notice that one of the flowers has a different perspective – you’re viewing it from the side. Flatten the nearest petal, then draw curved lines from the three nearest petals to the adjacent flower.
Step 3
Draw more flowers, so that they overlap with the flowers already there. Use a curved line for each of the four petals.
Step 4
Draw more four-petaled flower, rounding the ball at the top of the flower. Connect some edges using curved lines.
Step 5
Start creating textures and details for the flowers. Draw curved lines in the shape of a star in the center of each flower. Two lines should extend into each petal.
Step 6
Continue drawing stars in the center of the flowers until all the flowers are facing forward. Texture the edges of some petals with wavy curves.
Step 7
Start drawing hydrangea leaves. For each leaf, start with a long curved line for the central vein. Then outline the edges of the leaf using a series of short curved lines that meet at jagged points. Notice that the leaves overlap.
Step 8
Draw more leaves extending at various angles from the base of the flowers. For each, use a curve for the veins and short lines that meet at the jagged points to form the edges of the leaves.
Step 9
Use pairs of curves to draw flower stalks. Notice how the segments branch to support the leaves.
Step 10
Color your cartoon hydrangeas. Most hydrangeas are white, light blue, pale pink, purple, yellow, or some combination of these colors.


