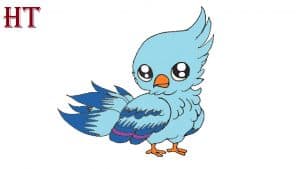
How to draw a cute bird easy with this how-to video and step-by-step drawing instructions. How to draw a bird for beginners and kids.

Please see the drawing tutorial in the video below
You can refer to the simple step-by-step drawing guide below
Step 1
Start by drawing guide lines that will help you outline the bird’s face. First, draw a circle. Then draw two curves across it. These lines should be approximately vertical and horizontal and meet at a perpendicular angle.
Step 2
Use horizontal guide lines to place eyes. For each eye, draw a series of curves, enclosing smaller consecutive circles on top of the guide.
Step 3
Where the guides intersect, draw an inverted egg shape to form the bird’s beak. Below the horizontal lines, draw a large oval on each side to form the bird’s cheeks.
Step 4
Delete vertical guides. Use the curves to create details for the mine. Notice how the lines divide the oval into the upper and lower parts of the beak, as well as the inner part of the mouth. Also of note, the tip of the upper beak. Then, use short lines that meet in points to wrap a tuft of hairs on top of the head. Cover short and thick curves to form eyebrows.
Step 5
Stretch a long curve below the head and fold it back over itself to form the body. Add the contour of the face, draw curves on each side of the beak and between the cheeks, head and body.
Step 6
Remove guides from the face. Extend a long curve from the body to form the front edge of the wing. Use a series of “U” shaped lines to draw large flying feathers, completing the wings. Then use the curves to draw the feathers on the chest and outline the upper part of the leg.
Step 7
Stretch one curve to form the top of the other wing. Draw overlapping “U”-shaped lines to outline the large flying feathers and perfect the wings. Erase the guides for the legs and wings.
Step 8
Use the curves to outline the “Y” shape of the foot. Connect them to the body using the curves to outline the lower leg. Text the foot with short curves and enclose a sharp triangle at the tip of each toe to form claws.
Step 9
Draw a series of overlapping “U”-shaped lines on each wing to add the texture of the feathers. Use many long, overlapping curves to wrap the tail.
Step 10
Color your cartoon bird. The spring-happy birds are often depicted as blue with a white or cream-colored belly.


