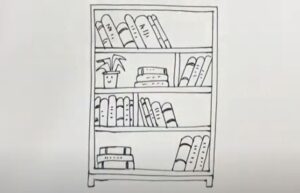
How to Draw a Bookcase with this how-to video and step by step drawing instructions. Expect 6 easy steps to follow, kids will enjoy designing their own bookcase on paper. Also included is a downloadable version of this bookcase drawing lesson.

Please see Bookcase drawing tutorial in the video below
You can refer to Bookcase simple step by step drawing guide below
Step 1. Sketch the body of the bookcase
First, draw a large vertical rectangle to outline the body of the bookcase. Then add a thin horizontal strip on top.
Step 2. Attach the legs
Next draw short legs at the bottom corners of the bookcase
Step 3. Partition shelves
Divide the shelves of the bookcase into sections by drawing evenly spaced rectangles.
Step 4. Add books
Draw thin rectangles on the shelves to outline the books. Add some detail to the spine of the book using lines and elongated shapes.
Step 5. Draw a plant pot
Start by drawing the cylindrical shape of the pot. Then add the pointed shape of the leaves poking out of the pot.
Step 6. Complete the bookcase drawing
Bring your bookcase to life by adding some color! First, use brown tones to color the bookcase. Next, use a green pen to color the tree and an orange pen to color the pot. Then, use various colors like purple, pink, and blue to fill in the book.


