How to Draw A Gemstone easy with this how-to video and step-by-step drawing instructions. Easy drawing tutorial for beginners and kids.

Please see the drawing tutorial in the video below
You can refer to the simple step-by-step drawing guide below
Step 1
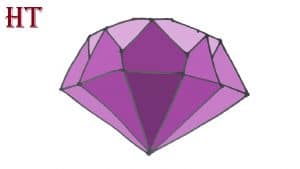
As they are refined and shaped, gemstones will often have a very angular structure to them. This is exactly what we will be drawing in this gem drawing tutorial.
For this reason, you may want to use a ruler when drawing, as it will help create many of the straight edges that this gem has.
For now, we will draw the top half of the stone. This top half will have a total of five edges, with the two on either side being the longest of them all.
The two edges above these will be slightly smaller, and they will culminate in a flat section at the top.
Getting the right angle of view of these edges can be a bit tricky, so make sure to take it slow and refer to our example carefully.
Step 2 – Now, draw the bottom half of the gem
The top half of this gem drawing has some intricate elements, but the second step of this tutorial will be much easier to do.
For this step of the tutorial, we just need to add two more edges to the gem. This is another step where using a ruler will be really helpful!
The two lines you’ll draw now will be the longest of the ones you’ve drawn so far, and they’ll extend down from the last edges you drew.
They will culminate at a pointed end at the bottom of the gem, as shown in the reference image.
Step 3 – Start drawing some inner edges for the gem
You’ve completed the outline for your drawing, so in this step of the how to draw a gem tutorial we’ll do some inner edges.
Gemstones often come in many fine, flat surfaces, and we’ll begin to carve these out now.
First, draw a slightly diagonal line down from each of the top edges of the gem.
Then draw two more lines going down from where the previous ones ended so that they meet at the bottom end of the gem.
After these new lines are drawn as they appear in our reference image, you can move on to the fourth step of the tutorial.
Step 4 – Next, draw some more edges for the gem
Continuing with this gem drawing, we will now add some more edges to the stone.
These edges will be front and center, and they will be some of the more complex edges we’ve drawn so far.
This is a step where you’ll definitely want to take a close look at reference images as you work!
The sides on the front will have two triangular sides on top and then a hexagon on the front face itself.
The two will be diagonal and form a pointed end at the top.
Two shorter lines will descend from these lines down, and eventually there will be two longer lines going down that meet at the bottom apex of the gem.
Once these shapes are drawn, you’re ready for the final details!
Step 5 – Add the final details to your gem drawing
Before you add some color to this gem tutorial, we have to finish the last little details first.
The lines that we will draw in this step will be horizontal for the most part and will pass through the center of the gem.
Draw several lines that go through the various vertical edges you drew, and try to use a reference image to guide you as you draw their corners.
Once you’ve completed these final edges, you can finalize this image by adding a background or maybe some fun extras! How would you like to complete this lovely gem painting?
Step 6 – Finish your gem drawing in color
Different gemstones are known for their distinctive colors, so the last step of this gem drawing is where you can tell what type this is.
In our reference image we have included some lovely purple hues to show that this gem could be an amethyst.
However, this is just one way you can color this image! When it’s done, you can search for different gems and then choose your favorite color for this image.
What colors and mediums will you use when completing this drawing?
Your gem drawing is done!
That brings you to the end of this very delicate tutorial on how to draw a gem!
Drawing an object like this can be quite complicated, as there are so many edges and aspects that are specifically designed to get it right.
Hopefully working through this guide will help you make it fun and easy!
Once you’ve finished this painting, you should go ahead and show off what you can do with your own final details, additions, background elements and color choices. Be sure to have fun creating with it!
You can also find some more great drawing tutorials to enjoy on our website. Remember to subscribe often, as we regularly upload new ones for you to enjoy!


