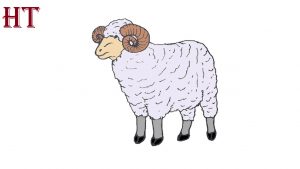
How To Draw A Ram easy with this how-to video and step-by-step drawing instructions. Easy animals to draw for beginners and kids.

Please see the drawing tutorial in the video below
You can refer to the simple step-by-step drawing guide below
Step 1
For this tutorial on how to draw a ram, we’ll start with the head and horns. The horns are quite special on this animal, as they curl up on their body to form an almost spiral shape.
You can start by using a slightly bumpy line to draw the zigzag horn for the ram. This horn will also have some thick line detailing along it to give it some rough texture.
Then we’ll use some pointed, jagged lines for the wool on top, and then you can draw the long, rounded muzzle of the sheep.
After drawing the muzzle outline, add a small and round eye near the top of the head, then you can draw the nostrils and mouth. Finish this step by drawing the tip of the other horn protruding, and then draw the front part of the chest.
Step 2 – Draw the back and hind legs for the ram
Continuing from the head section, next we will add the back and hind legs to your ram drawing in this next step.
Extend another bumpy line back from the base of the neck and let it roll into the back of the ram.
Then we will draw the following pins. The upper part of the leg will be large and slim, but the second part of the leg will be thinner and more angular.
Once you’ve copied these aspects as they appear in our reference image, we’re ready to move on to step 3!
Step 3 – Next, draw the first front leg
Now we will add the first front leg along with the belly in this step of the how to draw a ram tutorial. First, extend another cog line forward from the base of the hind legs.
It must have a very small curve to it, as it will form the belly of the ram. You can also add more small curves above it to further emphasize the smooth texture.
Then we will add the front leg, and it will look similar to the hind leg with the main difference being that it has a smaller upper half. When you are ready, we can add the final leg in the next step.
Step 4 – Now, draw the last pin for the ram
Before you add some final details to your ram drawing, we must first draw the final part. This leg will go directly next to the other front foot.
Like that leg, this leg will be covered with wool for most of its top half and only the thin bottom half is actually visible.
You can then fill in the last gap between the leg you just drew and the chest using one of those jagged lines.
Once that’s done, we’ll finish off this step by adding those little curves for a smoother texture.
Step 5 – Add some final details to your ram drawing
This fifth step of our ram drawing tutorial will be all about adding those final details so you’re ready for the final step of the tutorial.
These details will mainly consist of texture lines throughout the ram, but there will also be an opportunity to add some finishing touches of your own.
For the details that we show in our reference image, we have added a lot of small curves that we have used throughout this tutorial.
You can add more if you want this ram to look softer! Once you’ve added these details, you can add some of your own.
One of the best ways you can personalize a drawing is by adding a background.
There are countless options you can choose from to do this and you can do anything from painting him in a farm setting to creating a lush grassland background. How would you add to this drawing before coloring?
Step 6 – Finish your ram drawing with some colors
Ram is not the most colorful animal, but there are still ways to get some interesting colors in your ram drawing!
We have used a lot of light brown and beige throughout the image and the way we have combined them helps to further emphasize the look of the wool.
You can use any other color you like for his own color, or you can add some darker brown to make him look like he’s covered in mud.
You can also try with different shades and art mediums, so make sure to have fun with it and see what happens!
Your Ram drawing is done!
The wonderful drawing in front of you right now is proof that you have successfully completed this how to draw a ram tutorial!
We hope that this guide was really helpful to you and that you had a lot of fun making it.
Now that you’ve finished it, what additional details, colors or mediums do you think would work best with the picture?
Don’t forget to check out our site when you’re ready for more drawing fun! We’ve got plenty of guides for you to enjoy there and more along the way, so you’ll definitely want to check in often.
Once you’ve finished this ram drawing, go ahead and share it on our Facebook and Pinterest pages for us to enjoy!


