How To Draw A Doll easy with this how-to video and step-by-step drawing instructions. Simple drawing for kids and everyone.

Please see the drawing tutorial in the video below
You can refer to the simple step-by-step drawing guide below
Step 1
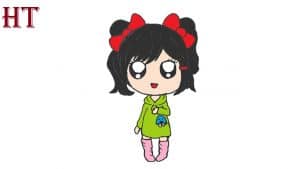
To start this doll drawing tutorial, we will start with the doll’s head and hair.
The doll that we will be drawing in this tutorial will be slightly stylized, as it will have a large head with a small, thin body. To start drawing this head, you can first draw a curved and rounded horizontal line.
This line will act as the bottom part of your doll’s face. Once that line is drawn, we’ll next use some sharper lines to show the protruding edge of the face.
Finally for this step, we’ll use some more curves on top to show her hair.
Step 2 – Next, start drawing the face
As we mentioned before, this doll drawing will have a stylized look to it. The same is true of her face.
Her eyes will be relatively large, and you can contour them by adding two sizable circles to her face. The eyes should be quite far apart and near the sides of the face.
Then we will draw a reflection effect on the eyes. You can do this by drawing a thin crescent at the bottom of each eye.
There will also be a small circle at the bottom of each of these crescents. The left eye will also have some extra circles above the crescent to complete the effect.
Before continuing, you can also add some small lines at the corners of your eyes for some lashes, and then draw a small smiley face.
Step 3 – Draw her hairstyle in this next step
Dolls will usually have a nice hairstyle that you can change and brush. We will add a cute hairstyle to this hairstyle in the next step of the doll drawing tutorial!
You can start this hairstyle by using some simple circles to create a bow on each side on top of her hair.
You can then finish by drawing some more wavy lines down from these bows to show her hair falling down the back of her head.
Step 4 – Now draw the top of her outfit
In the same way that dolls often have pretty hairstyles, they also often have a cute outfit. We’ll add the start of that outfit to your doll drawing in this next section.
The outfit we designed for this photo consists of a hoodie with a small accessory in her front pocket.
You can draw the hoody’s flat top using some slim shapes at its neck. You can then draw her with one arm raised slightly and the other lying flat at her side.
Finally, we can draw the bottom of the hoodie, the beginnings of her legs, and the little accessory. Then you’ll be ready for the final details in the next step.
Step 5 – Add some final details to your doll drawing
Now it’s time to finalize the details and final elements of the painting in this step of our how to draw doll tutorial.
The main thing to draw in this step are the boots she is wearing, and you can draw them into some pretty simple slim shapes. Then you can finish by drawing some more details on the right eye.
Before continuing, you can also change the drawing with your own details and elements. You can do this by changing the design to create a new doll or you can draw a set of backgrounds for her.
There are also tons of accessories and doll friends you can add for her, so be sure to have fun with it when you’re done!
Step 6 – Finish your doll drawing with some colors
For the final part of your doll drawing, we’ll finish her off with some awesome colors. In our reference image, we used some brown for her hair and then went with pink with white spots for the bows.
We also used the same pink color with white dots on her boots.
Finally, we used green for her outfit and a few other colors for the smaller details. These are the colors we’ve chosen, but what colors and art mediums will you use to color your way?


