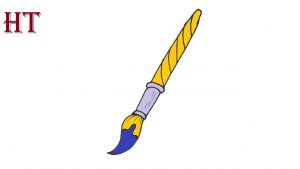
How to Draw A Paintbrush easy with this how-to video and step-by-step drawing instructions. Easy drawing tutorial for beginners and kids.

Please see the drawing tutorial in the video below
You can refer to the simple step-by-step drawing guide below
Step 1
To start this brush tutorial, we’ll start with the handle of the brush.
This part of the handle will be the part of the wood that you will actually hold in your hand when painting. There will also be a ridge at its base that you can draw with a thin circle.
The handle itself will be drawn with some very slightly curved lines culminating in the end.
Once you have finished drawing this wooden handle, you can move on to the next step where we continue with this drawing.
Step 2 – Next, draw some more handles
You have drawn the wooden part of the handle and now we will add a shorter metal part to your brush drawing.
This metal part will generally connect the handle to the actual bristles of the brush. To draw this, just draw some slightly more curved lines that culminate in one of the other small, slim shapes you drew at the base of the wooden part of the brush handle.
That will take care of the contour of the handle, and in the next part we will work with the bristles of the brush.
Step 3 – Now draw the brush head
Having a brush handle is nice and good, but it wouldn’t be a good brush without some bristles.
We’ll be adding these in this aspirational step of the how to paint brush tutorial. This part of the brush will connect to the end of the metal you drew in the previous step.
Its base will be drawn with some curves resulting in some paint gathering at the end of the bristles.
You can paint this paint with some more rounded lines, and you can distinguish the bristles from the paint by adding some lines on the bristles.
Then we can start adding some final texture details in the next few steps, so let’s move on!
Step 4 – Next, paint some wood texture details for the brush
For the next few parts of your brush drawing, we’ll go back to the previous elements you drew and add some detail to them.
For now, we will focus on the wood part of the handle to make it look more like wood. To do this, you can draw some diagonal lines along the handle to give it a wood grain look.
That’s all that needs to be done for this part, so we’ll move on to some final details for the brush in the next step.
Step 5 – Now, finish the drawing with your paintbrush
The details that you will add in this step of our brush drawing tutorial will be very small, but they will also complete it nicely.
You’ll also be able to add some of your own details and additions in this step, so there’s going to be a lot of fun in this one!
For our details, we’ll add some fine lines to the metal part of the brush to make it look like it’s made of shiny metal. Once you’ve drawn these lines, you’re technically done with this step.
Before moving on to the final section, you can add some of your own elements and details to it.
You can draw several different sized brushes lying next to it, add some other painting tools, or even get a glimpse of the picture this brush is doing.
These are just a few ideas, but what else can you think of to complete this picture before the final step?
Step 6 – Finish your brush drawing with some colors
This is the final step of your paintbrush painting process, and this is where you can bring your painting to life with some amazing colors!
We used some brown and gray for the brush while using some purple for the paint at the end of it. However, this is just one example of the colors you can use for it.
Looks like this picture involves paint, that gives you a ton of color options that you can choose from!
However, color is only part of the process. You can also experiment with different mediums, and maybe even use some thick paint on top of the brush for a cool feel.
We can’t wait to see what colors and mediums you used to complete this image!


