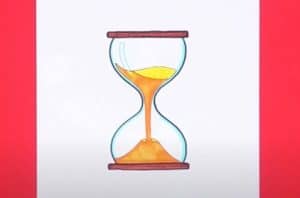
How To Draw An Hourglass easy with this how-to video and step-by-step drawing instructions. Easy drawings for beginners and kids.

Please see the drawing tutorial in the video below
You can refer to the simple step-by-step drawing guide below
Step 1
An hourglass will usually have a frame to hold two glass containers containing sand.
We’ll start with that frame in the first step of the hourglass drawing tutorial. For starters, the top of the frame will appear first. First, draw two connecting curves for the top part of the frame.
Then add two more curves below the top of the hourglass for the base of this part of the frame.
Finally, draw two small circles in the corners for the ends of either side of the frame. Once you’ve drawn these lines, you’re ready for step 2!
Step 2 – Next, start drawing the edges of the hourglass
Now that you have completed the upper part of the hourglass drawing, we will next focus on the side supports of the frame.
They will extend down from the top circles you drew in the previous step.
These will be thin supports that help hold the two sides of the frame together, but they will also be elaborately decorated and look like they were carved from wood.
There will also be some thin, circular shapes in the center of the stand for some extra detail. You can also change the look of some of these decorative elements if you want!
Step 3 – Draw the glass of the hourglass
Without the inner glass case, an hourglass is not only useless, but it can also spill sand everywhere!
For that reason, we will be drawing the glass case in this step of the hourglass drawing tutorial.
This glass case is separated into two circular sections connected by a thin center section between them.
You can draw these sections using some curved, circular lines going down from the top of the frame.
There will be a gap at the bottom of the glass case, but we’ll fill that void shortly. Once you’ve drawn the lines for the shell, you’re ready for step 4!
Step 4 – Now, draw sand for your hourglass
As much as an hourglass won’t work well without glass, it’s equally useless without some sand! In step 4 of your hourglass drawing, we will add that aspect.
For the sand in the bottom half, draw a circle with a thicker base with a thin tip on top. You can also add some dots above this tip to get more sand flowing down it.
For the top half, add another triangle with a rounded top to create a smaller falling sand block.
Then you can add some smaller line details to get ready for the final details in the next step!
Step 5 – Finishing the base of the hourglass
In this step of the hourglass drawing tutorial, we will focus on its base. The base should look like an exact mirror image of the top you drew in step 1.
That means it will have two levels where you can draw with some circles. Once you’ve finished drawing this base, you’ve completed all the details in this picture!
We’ll move on to some coloring games in the next step, but you can also continue with some of your own.
Some ideas might include engraving a message or a pattern onto the hourglass’s frame.
You can also draw the background and can display this hourglass on the table along with some other objects.
These are just a few of the countless ideas you can work on, so how would you complete your hourglass drawing for the final step?
Step 6 – Finish your hourglass drawing with some colors
You’ve reached the final step of the hourglass drawing and for this part you can have fun giving it some great colors! In our reference image, we used some golden yellow to make it look like the frame is made of gold or copper.
Then we used different shades of blue for the glass and then used some yellow for the sand.
These are the colors we chose, but this is your drawing and you should feel free to use any color you like!
You can also experiment with different art tools and media to bring colors to life, so there are plenty of ways you can get creative when you finish this drawing.


