Realistic Shark Drawing by pencil with this how-to video and step-by-step drawing instructions. How to draw ocean animals for beginners and all.
Please see the drawing tutorial in the video below
You can refer to the simple step-by-step drawing guide below
Step 1
Start with an elongated teardrop shape – the pointed end will serve as the tip of the shark’s spine and the rounded end will serve as the tip of the head. Notice how the teardrop is at a slight angle with the bottom segment parallel to the bottom of the paper – this is important as it affects the angle of view of the shark. Draw a small circle about halfway between the highest point of the upper tear arc and the tip of the nose, as shown. This will be the eye and should be drawn close to the top of the head, but leave a small gap like I did.
Step 2
In this step, we draw four of the five main fins. These are fairly simple to derive; the only difficulty lies in making sure they are placed correctly and of the right size. The caudal fins are easy to place as they are drawn at the tip of the tail, as shown. Causes the upper caudal fin to be clawed back and larger than the lower fin which is smaller and more upright. The dorsal fin (the fin at the top of the shark’s back) is also easy to place – make the front edge start slightly off the top of the teardrop shape. When drawing the left fin of the shark, make its back edge slightly end forward where the dorsal fin begins (in the vertical plane). Then you just draw the rest of the fin as shown – just make it roughly the same size as the dorsal fin.
Step 3
Erase some lines where the fins attach to the body. Now let’s add the top edge of the right fin – this fin fits pretty well into the drawing’s perspective, so we won’t really see that much. It will start in the same vertical plane that the dorsal fin begins. Now draw four more evenly spaced and equally sized lines at a slight angle to form the outline of the gills, as shown. When drawing the mouth, start at the midpoint between the left fin and the tip of the shark’s nose/face. Finally, don’t forget the small fin just in front of the tail.
Step 4
Finish the right fin by drawing the back edge as shown. Notice how there’s a weird hook-like shape on one end of it – I know it looks weird at the moment, but when we start shading it will make sense. Next, you need to add a small fin on the top of the shark’s spine, just in front of the caudal fin. Finally, add an incision in the nose for the nostrils and a small semicircle around the corner of the eye – giving it a slight pinch in the middle.
Step 5
First, add the small fin on the bottom of the shark that I skipped in the last step. Now the outline of the drawing is complete and we can start shading. As you can see, the base layer of shading is a rather complicated process, but there is a specific method that you must pay attention to. To create a shaded patch requires an initial layer of graphite, which you then smooth with a cotton pad or paper towel. The original graphite layer is coated by using the blade of your pencil (it is recommended to hold the pencil at an angle) and gently pulling it across the page. Since we’re going to be shading multiple layers, you don’t have to worry about making this initial layer too smooth and consistent – the pencil strokes don’t need to be parallel and you may have some small gaps here and there. there. Note that there are different tones – for darker areas use a 2B or 3B pencil. For brighter areas, use an HB pencil. Note that I left the gill area completely blank and the patches of light through between the shark’s face and top of the head.
Step 6
Shade a base layer for the rest of the shark’s body, as shown. Note that there is a thin band of lighter color running down the top of the spine and that part of the lower caudal fin is lighter than the rest.
Step 7
Now we can smooth the ball with cotton pads or paper towels. If you’re not familiar with this technique, it involves taking a small group of material and rubbing graphite against it in small circular motions or left-right-left-right motions. It’s a pretty intuitive technique – you’re basically trying to smudge the graphite around so they blend together smoothly. Some general tips when shading – (1) don’t be too strong or too fast as that can damage the paper, (2) make the movements cover an area just the right size so the graphite is more evenly distributed , and (3) don’t blend the darker and lighter patches, or they’ll blend together and lose their focus (unless you want a gradient effect). Oh, and don’t use your fingers – ever! Your skin is covered with oily secretions that seep into the paper and interfere with the application of graphite. You should try to avoid any contact between your hands and the paper (put your hands on the second sheet of paper when drawing). ** Also read steps 9 and 10 for more tips before getting started **
Step 8
Now we start the second shader layer. This time, we want to make some parts darker, so let’s use a 4B pencil. The dorsal fin should be completely dark, while the caudal fin highlights should be lighter. The right fin has a dark tip and back edge, but make sure you leave it light as this will be the highlight later. The part between the gills and the eyes should be darkened, but leave a slight streak of it brighter (look at the last image for what we’re trying to achieve here).
Step 9
Smooth out the shading from the previous step using a cotton pad/paper towel. You must make sure there is no small eraser on the paper or cotton pad/tissue before you start blending, otherwise you will erase fine lines all over the shading. Also you definitely DO NOT need to separate the two shader stages (put the graphite and blend it) like I did. I’m just doing this for the sake of the tutorial – when I’m just drawing normally, I’ll *constantly* switch back and forth between blending and placing the graphite until I’m happy with the result.
Step 10
Continue to darken certain parts of the image and smooth it with a cotton pad/paper towel. In this step, I started shading the tip of the nose/head and continued to define the shape of the fins. See how I’ve also got graphite smudges on the outline of the drawing? That’s probably unavoidable if you want to get shading right to the edges of the drawing.
Step 11
In this step we will remove the unsightly ‘overflow’ ghosting described in the previous step without deleting the part of the drawing you want to keep. This is pretty easy with the shark since most of the contours of the drawing are straight lines. You will need to use a piece of scratch paper and place it on the actual drawing with the outline of the paper aligning with the outline of the drawing. You’ll want to make your strokes in one direction away from the drawing (start by erasing on the edge of the paper that covers your artboard and erasing from it). You will probably need to rearrange the paper mask quite often if the outline starts to curve and you may need to go back later and just redraw the edge of the artboard.
Step 12
Develop the area around the eyes. You want to make this area very dark and the border between the upper part of the eye socket structure and the top of the head should be quite clear. Also note how the shade surrounds the eyes (see inside image enlarged). I’ve also started shading the area around the nostrils – it looks a bit weird at the moment and perhaps darker than it should be, but will be developed in the next step.
Step 13
When you darken the rest of the shark, you will see quite clearly that the white parts of the face are too pale. Here we shade very lightly on these areas and blend them. Better do this gradually instead of making the area too dark (trying to remove the ghosting becomes quite messy). Also note how the shade in front of the mouth has a part that remains light – this part will not be affected.
Step 14
Darken the lines of the mouth. Note that there are two lines – one of the lower jaw and one of the top – that overlap.
Step 15
Four things happen in this step. First, the top edge of the right fin (top left image) is drawn – note that there are two thin light bands along either side of the dark band. Second, another small caudal fin is added to the rear part of the body. Because from a viewing angle, we can only see the front edge and the whole thing looks pretty weird (bottom center). Third, we start shading the gills (bottom right image). Leave thin light bands at the bottom and top of each gill, but not in the center. You should also define gill contours at the bottom and top of the gills, but not too much in the center. Finally, darken the contour of the eye (upper right part) and shade as shown. Note the small, unshaded oval piece of paper at the top of the eye.
Step 16
Finish shading the gill and the area directly above it. Notice the two highlights in this area (shade the area first and then use your eraser to create highlights). Finally, don’t forget to darken the pupils of your eyes!
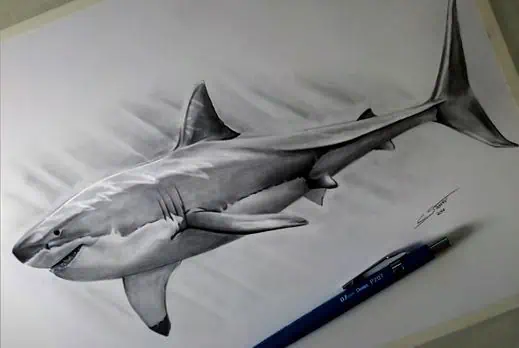
Step 17
I hope you enjoyed this tutorial on how to draw a realistic shark and found it helpful. If you’ve read through this tutorial and don’t think you can finish it, I still strongly encourage you to try drawing anyway to develop your shading skills.


