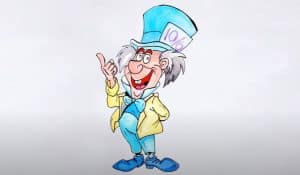
How To Draw The Mad Hatter easy with this how-to video and step-by-step drawing instructions. How to draw cartoons for beginners and kids.

Please see the drawing tutorial in the video below
You can refer to the simple step-by-step drawing guide below
Step 1
For the first step of the Mad Hatter tutorial, we’ll start with the outfit he named after: His signature hood.
Also, the portrait we will be doing in this tutorial will be based on his appearance in the classic Disney animated movie.
First, use a wavy line for the base of the brim of his hat. Try to copy the line as close to how it appears in the reference image as possible. Then add a slightly curved rectangle on top of the rim.
Next, you can draw the top of his hat. This shape will be drawn with a different curve, and it will be a little narrower near the base and a little wider at the top.
Once you’ve drawn the hat, we can move on to step 2 of the tutorial.
Step 2 – Now draw his face and hair
You’ve finished his hat and now it’s time to start painting the face and hair for your Mad Hatter drawing in this second step.
First, start by drawing two small circles close to each other. Add a dot to each one, and that will take care of his eyes.
Then you can draw some eyebrow shapes above the eyes, and then use a large circular line for the bulbous nose.
Then add his grinning mouth below his nose and draw some squares for his crooked tooth.
Next, draw the outline of his face and ears, and finish using some pointed curves for the hair sticking out from underneath his hat. That will end his head so we can do step 3.
Step 3 – Draw his jacket and bow
Next, we’ll draw his jacket and tie in this third step of the Mad Hatter tutorial.
Start by drawing a circle below his head for his bow tie, and then draw edges on it. Then we’ll use some curved lines to draw the high collar of his coat below his head.
Then his left arm will be extended, while the other arm will be crossed behind his back. Finish by drawing the bottom of his jacket and shirt, then move on to the next step.
Step 4 – Next, draw his legs and shoes
The next step of your Mad Hatter drawing will see you add legs and shoes to the character.
This character is pretty short, so we’re going to make his legs rather short to add to that look. They will be drawn with some more curved lines so that they are closer to each other.
You can then finish this step by drawing his shoes underneath his pants. As shown in the reference image, they will be positioned so that they are facing out.
After these parts are drawn, we will finalize the details and strokes in the fifth step.
Step 5 – Add Final Details to Your Mad Hatter Drawing
Now you’re ready to complete this portrait in this step of our how to draw Mad Hatter tutorial!
In this step, the last thing we’ll add will be his hand sticking out of the arm of his extended coat.
This hand will be facing up, but you can also draw a teacup or other prop for him to hold! You can then finish with some spikes in his hair to make it look more textured.
Before you move on to the final step, be sure to add any additional elements or ideas you might like to it! Can you think of a funny setting or characters you could draw to go with him?
Step 6 – Finish your Mad Hatter drawing with color
The final step of your Mad Hatter drawing will be to finish it off with some color. In our reference image, we chose the color the character appears in when appearing in the movie.
That means we used some green for his hat and clothes, and they contrasted with beige for his jacket.
This reference image can serve as a guide if you want to keep your monitor’s colors accurate, but you can also use your own color choices for a unique variation!
You can also have fun with the art media and tools you use, so how will you complete this amazing painting?


