The British Royal Family is perhaps the most important British institution in the country. Every year, countless books, magazines, articles, TV shows and movies are created around the famous royal family and people just can’t seem to get enough!
Heading the family is the Queen, who has reigned for almost 70 years with no signs of slowing down.
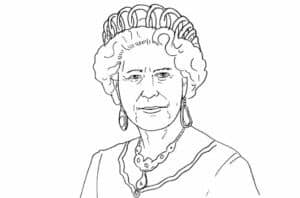
For monarchy enthusiasts, creating some royal artwork can often be a lot of fun, and learning how to draw the Queen can be a great way to do that.
This will be the perfect guide for you if you are one of those enthusiasts!
Why not enjoy a delicious cup of tea when you enjoy this very royal step-by-step tutorial on How to Draw Queen Elizabeth in 8 steps.

Please see Queen Elizabeth drawing tutorial in the video below
Queen Elizabeth Drawing Step by Step
Step 1
We will simplify this first step in our how to draw Queen tutorial. Now we’ll start with contouring her face.
You can use a curved line for her face, then draw two curved lines extending down for part of her neck. That’s all it takes for this first step, so when you’re ready, we can move on!
Step 2 – Next, start drawing some details on the face
When painting a picture of a real person, the hardest part is often getting the facial features to look right.
That’s why you may want to closely copy the reference image we gave you in this part of your Queen drawing.
You can start by drawing some simple curves for her nose and mouth. There will also be some lines around these parts to give more detail to her face.
Then we’ll draw her eyes, which will be slightly narrowed. They will also have some lines around for more details.
As long as you take your time and stick to the reference image, it should be easy!
Step 3 – Now, outline her hair
Continuing in this Queen’s drawing tutorial, next we’ll start contouring her hair.
This outline will start near her ears later on and you can draw it using some connecting wavy lines.
Her hair puffs out a bit on the sides, but it’s going to be a little flatter at the top as we’ll be attaching her crown to it soon.
Step 4 – Next, draw some more details for her hair
The hairline has been drawn and in this part of your Queen drawing we will add some more details to make it look more realistic.
To do this, you’ll be adding more circles and curls throughout different sections of her hair to make it look frizzy. Then we can move on to the fifth part of the tutorial!
Step 5 – Now, draw her shoulders and cleavage
For this fifth step of the Queen’s drawing tutorial, we’ll be adding her shoulders and the top of the shirt she’s wearing. Extend some solid lines diagonally from the base of her neck to her shoulders.
Then there will be a wavy necklace around her neck, as shown in the reference image.
Finally, add some lines around her shoulders to show where her arms start and where the fabric is creased.
Step 6 – Next, draw some of her jewelry
The Queen is known for having some of the world’s most luxurious and expensive jewelry collections.
We will paint some of these famous jewels in this part of your Queen drawing. First, use some round shapes for the earrings that hang over her ears.
Then, for her necklace, you can draw multiple minifigures that join together to form a line for her necklace chain.
Finally, use some more rounded shapes for the jewelry and set up different parts of her necklace.
Step 7 – Draw her crown in this step
This drawing of the Queen wouldn’t be complete without the crown on her head, and we’ll be drawing the crown itself in this step of the Queen’s drawing tutorial!
This crown is quite unusual and it will be drawn with several circles that circle in and out of each other, as shown in the reference image.
Once you’ve finished drawing the crown, you’ll finish this painting! Before moving on to the final step of coloring the image, you can also paint an elegant background or some additional detail to really complete the photo.
Step 8 – Now finish it with some color
For the final step of your Queen drawing, we’ll finish off with some gorgeous colors! For the dress she is wearing, we used some lovely shades of green for it in our reference image.
Then we used some nice yellow with red and brown mixed in for the different pieces of jewelry she was wearing.
These are the colors we will choose for this image, but there are many other colors you can choose from instead! This is your chance to get really creative and show off your idea of a royal outfit.


