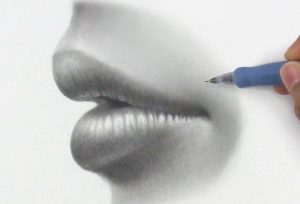
How to Draw Lips from the side easy with this how-to video and step-by-step drawing instructions. Pencil drawing tutorials for beginners and All.

Please see the drawing tutorial in the video below
You can refer to the simple step-by-step drawing guide below
Step 1
Selecting upper and lower lip positions This first stroke will determine if you will draw an overbite, a normal bite, or a deep bite.
Step 2
Select lip angle This second stroke determines the thickness of the upper and lower lips and whether the corners of the mouth are angled up or down.
Step 3
Draw a triangle Turn your sketch into a triangle. The longer your triangle, the wider your lips will be.
Step 4
Draw the corner of the mouth Draw the corner of the mouth. This can be a simple dot, bracket, raindrop shape, triangle, etc.
Step 5
Draw the upper lip You can start with the top or bottom lip. For this tutorial, I started with the top part. Draw a curved line starting at the top left corner of the triangle. This curve can almost follow the shape of a triangle, protruding outward or well drawn inside the borders. Up to you.
Step 6
Finishing the upper lip Connect the curve you just drew with the corner of the mouth. Avoid drawing a straight line. It is better to draw a slightly curved line than a completely straight line.
Step 7
Draw the lower lip To draw the lower lip, start your stroke from the bottom left corner of the triangle and wrap it until it touches the top lip.
Step 8
Draw upper lip and lower lip Draw upper lip. Be careful not to stretch your line too far. The upper lip must be the same thickness as the upper lip or more. When drawing lower lip/chin for dark spots, make sure that the curve is less obvious. The bottom set of teeth push the lower lip/lower lip forward, reducing much of the curvature.
Step 9
Draw the outline of the upper and lower lips Using your HB pencil with as little force as possible, draw contours around each lip, connecting them to the corners of the mouth. Then delete your rule.
Step 10
Adding contour lines Time to shade! If you think your line is too bold, use a kneaded eraser to remove a layer of graphite from your drawing. Then use a sharp HB pencil to draw your contours.
Step 11
Shading Lips Start creating more contour using your HB, 2B, then 4B pencils. Around the edge of each lip, soften your edges so they’re not too rough.
Step 12
Skin Shading For this tutorial, I used the cyclic method to shade the skin around the lips. I used a blunt HB pencil and created layers and circles. Then use 2B to shade the darker areas. I shaded areas like the lower lip, cheeks, corners of the mouth, and the skin directly under the nose a little darker.
If you still see a lot of white space, use an HB pencil to apply more layers to the skin. Don’t press too hard or your circles will be very visible!


