How to draw a Face from the Side easy with this how-to video and step-by-step drawing instructions. Pencil drawings for beginners and everyone.
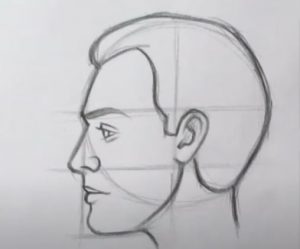
Please see the drawing tutorial in the video below
You can refer to the simple step-by-step drawing guide below
Step 1
Start with an oval: Draw an oval and place a horizontal line below it, slightly smaller than an oval. Then draw a vertical line down the middle.
Step 2
Draw a ruler: On the side, draw a ruler the same length as your drawing and divide the ruler into eight equal spaces starting at the center. Make sure the spaces are as equal as possible! Use a straight edge to stretch these marks across your artboard without pressing too hard. You can also make these lines without a ruler on the side, but I recommend using it at least the first 2 or 3 times you practice drawing a face from the side.
Step 3
Add an ear: Draw an ear on the left side of the head between line C and line 2. Click here for detailed instructions on how to draw the ear.
Step 4
Face contour: Draw a line down the front of the face (let’s call this a face line). Stop at line 2 and lean in for the rest of the way down. Connect the ears to the chin to complete the jawline.
Step 5
Second Ruler: Draw a horizontal line at the bottom of your drawing that extends from the center of the head to the front of the face. Divide the line segment into 6 parts. You can forget about this ruler for now. We will come back to it later.
Step 6
Define the brow bone: Draw a shallow ‘c’ shape where the Center Line and Face Line intersect. Shape the brow bone, trace the line up to the forehead and merge this line into an oval shape.
Step 7
Draw the nose: Draw two small circles: one on the face between lines 1 and 2 and another to the right of that circle. Click here for detailed instructions on how to draw a nose from the side.
Step 8
Lips and Chin: Draw your straight edge or ruler to the marker labeled ‘H’ and draw a line across the face. Draw the upper lip below line 2. Now that we’ve drawn a lip, it’s time to draw the corner of the mouth. Make a small tick on line H. Draw the bottom lip line above line 3. Underbite or overbite ?? Your choice! Follow up with jaw and chin. Remember that they don’t need to follow the underlying layer created in step 4.
Step 9
Eyes and Eyebrows: Draw a line from the marker labeled ‘G’ all over the head. To draw the eyes, create a triangle between the G and H lines on the Center Line. Click here for a detailed tutorial on how to draw eyes from the side! If you want to apply the method in the link, create another vertical line that shoots up from the tick labeled F and draw your circle (eyeball) between F and H on the Center Line. Draw the eyebrows below the C line.
Step 10
Back of Head, Neck, and Hair: Draw the top and back of the head in an oval shape along the oval and sloping all the way down, creating the back of the neck. As you draw the front part of the neck, try not to go too far to the left past the center of the head. Draw a regular hairline on the forehead between the A and B lines or a hairline above the A line. Add some finishing touches.. and you’re good to go! Practice this a few more times and when you feel comfortable, try drawing without the two rulers on the side and bottom of your drawing!
