How to draw Gundam easy with this how-to video and step-by-step drawing instructions. Cartoon drawings for beginners and kids.
Please see the drawing tutorial in the video below
You can refer to the simple step-by-step drawing guide below
Step 1
Start by drawing Gundam’s face. Use straight lines to outline triangular eyes and a “W” below them, trapezoidal cheeks and chin. Draw two wide, inverted “V” shaped lines in the center of the face.
Step 2
Finish sketching the Gundam’s head. Use straight lines to enclose a large “V” shape above the face. Enclose an inverted pentagon at its center and give it a three-dimensional shape using a “Y” shaped line Use straight and curved lines to draw rectangles on each side of the face . Shade the four small squares inside each. Connect the “V” to the visor and the sides of the face using curved lines.
Step 3
Use straight lines to enclose the two trapezoids partially at the center of the “V.” Draw a small circle on each side of the head and paint a smaller circle inside it. Then start outlining the chest and shoulders. Use straight lines to outline the trapezoidal neck, boxy chest, cubic shoulders, and top of the arms.
Step 4
Draw the shield – an oblong hexagon – using six straight lines. Wrap a long smaller hexagon inside it. Near the top, draw a small rectangle and shade a smaller rectangle inside it. Draw lines at the corner and along one side of the inner hexagon. Use curved lines to enclose the hand.
Step 5
Use eight curved lines to draw a four-pointed star on the shield. Draw two small circles near the top. Then detail the Gundam’s chest. Draw two rectangles crossed by horizontal lines. Between them, enclose a pentagon. Draw a horizontal line in the middle and a triangle on one side. Then wrap the two trapezoids in the bottom half.
Step 6
Wrap the long and narrow trapezoids to form the body. Draw a short line through the corner for a three-dimensional look. Then, use straight lines to enclose the rectangular arm, with a rounded section and a curved rectangle at the elbow.
Step 7
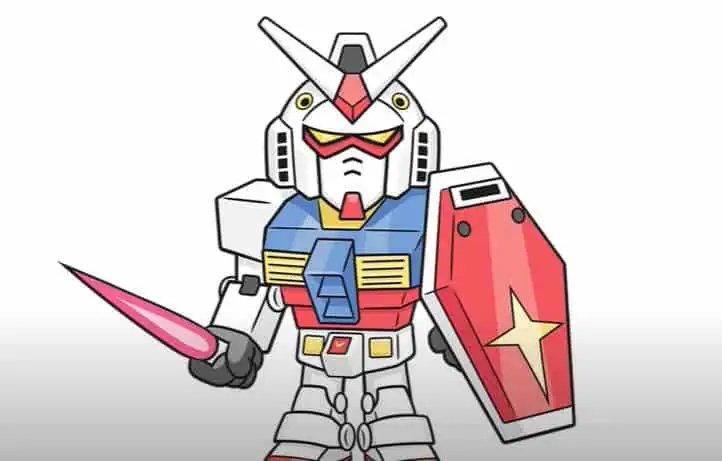
Complete the body. Use curved and straight lines to wrap irregular shapes. Then draw hands, using overlapping curves. From the hand, extend a pair of curves, allowing them to meet at a sharp point. Wrap the weapon like a sword with a short curve near the hand.
Step 8
Body detailing with small squares and a straight line. Then, use curved and straight lines to outline four irregularly shaped leg and foot segments. Draw ovals as joints between the segments.
Step 9
Foot detail with perpendicular curves. Then, use curved and straight lines to outline four irregularly shaped leg and foot segments. Draw ovals as joints between the segments.


