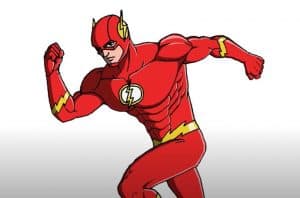
How to Draw Flash easy with this how-to video and step-by-step drawing instructions. Easy drawing tutorial for beginners and kids.

Please see the drawing tutorial in the video below
You can refer to the simple step-by-step drawing guide below
Step 1
Unlike Robin and Green Lantern from our drawing lessons, Flash in our lesson will be drawn in a rather complex and non-static pose. But despite this, all the principles of drawing will be exactly the same as in other drawing lessons. So, first of all we sketch the head in the form of an oval. Next, outline the spine, ribcage, and pelvis.
Step 2
So let’s add some “flesh” to the Flash’s body. On the top outline the symmetrical contours of the face that must intersect in the center of the face (near the bridge of the nose). Next, we outline the narrow body at the waist area. Next, we sketch the arms and legs with simple geometric shapes, such as circles and oblong cylinders.
Step 3
Okay, the main outline of our superhero is ready and from this step we will add the details. Using the horizontal line sketched in the previous step, we draw the eyes. On the vertical line, draw a nose and mouth that is exactly between the tip of the nose and the chin line.
Step 4
We continue to draw the head of one of the fastest superheroes in the comics (by the way, who is faster, DC’s Flash or Marvel’s Quicksilver?). We draw the contours of the head as in our example. Next, we draw the openings for the eyes and mouth. Don’t forget to draw wings on either side of the head.
Step 5
We continue our drawing lesson on how to draw Flash from DC. Carefully draw the lines of the torso, chest muscles and abdomen. In the middle of the chest draw the Flash logo and the belt in the form of a lightning bolt.
Step 6
We draw round and strong delta muscles. Continue the lines of the deltoids going to the biceps and triceps. Then draw the arm that should be narrow in the wrist area. Draw the outline of the glove in the form of a lightning bolt and move on to the next step.
Step 7
Now let’s move on to the lower part of our flash’s body. Draw the lines of strong legs (we think he spends a lot of time in the gym for his legs). Draw the lines of the muscle and the knee. At the end of the step, we remove all unnecessary lines and add details, such as the wings on the shoe and the lines of the sole.
Step 8
This is a drawing lesson on how to draw Flash step by step finished. Here we need to add shadows and remove all remaining unnecessary lines. To create classic shadows from the comics, use clear and dark strokes. You can create a bright shadow like in our example, or create a larger contrast shadow like in the Spider-Man drawing lesson.
Did you like this drawing lesson? If yes, then don’t forget to share this drawing lesson and subscribe with us on social networks. Also write the drawing lessons you want to see on the pages of our website.


