This tutorial shows how to draw a pair of earrings with a fairly common design in four steps. It provides easy to follow examples and quick and simple instructions.

You can preview the steps to draw the earrings in the image above. There is also an additional example at the end with alternate combinations of colors.
Start the tutorial with a pencil and draw light lines as you will need to erase small parts of the drawing in one of the steps. Light lines will also make it easier to correct mistakes. You can darken them later with a black pen or marker.
Please see the drawing tutorial in the video below
You can refer to the simple step-by-step drawing guide below
Step 1 – Draw the bottom of the earring
Start by drawing the bottom sections of the earrings. In this case, they will have a teardrop-like appearance but have flat tops that look like they’ve been cut off.
Step 2 – Draw the vertices
Add two “hats” to the parts drawn in the previous step. On the top of each “cap” draw small ropes that are each shaped like an upside down “U” letter. Try and make them quite thin compared to other parts.
Step 3 – Draw the Ears & Finish Drawing the Line
Erase a small bit of each “U” shaped wire and draw earplugs attached to them. They should be shaped like an upside down hook, as shown in the example.
After sketching out all the parts of the earrings, you can mark them off with a thin black marker or pen. If you don’t have one, just darken your lines with a pencil.
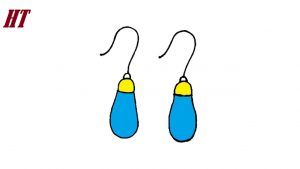
Step 4 – Color the Earrings
You can make the earrings any color you like. However, their metal parts often tend to be gold or silver. Also, to show that the earrings are shiny, leave a few white reflections in each as shown in the example. Sketch them with a regular pencil or the same color that you would use for each part and then just color around them.
To get yellow, you can use yellow mixed with a bit of brown. For example, if using crayons, you can first use the yellow pencil and then gently go over the brown pencil.
In this first example, the bottom parts of the earrings which can be stones, gems or even just plastic will be red.
Alternatively, if you want the metal parts to look like silver, you can make them gray as shown above. You can also see what they would look like with blue stones/gems.
Inference
This tutorial shows you how to draw a pretty simple pair of earrings with two different color variations. Of course, you can also experiment with other colors or even change the design of some of their parts.
If you enjoyed this tutorial and found it helpful you may also wish to try some of the following:


