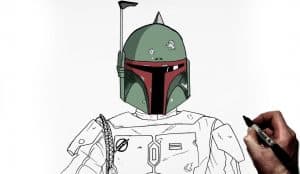
How To Draw Boba Fett easy with this how-to video and step-by-step drawing instructions. Easy drawing tutorial for beginners and kids.

Please see the drawing tutorial in the video below
You can refer to the simple step-by-step drawing guide below
Step 1
We’re going to start this tutorial on how to draw Boba Fett by drawing his shoulder on the left along with the top of his jetpack.
First, draw two curved lines close together for the rim of his armor, where his arms will stick out.
Then draw some more curves to create a small piece of armor that drapes over his shoulders.
Once those sections are drawn, you can add a border for his arm to drop down. Finally for this step we will draw the upper part of his jet set.
This part is almost like the head of a rocket and it will be drawn into several parts. Once you have it in place like in our reference image, you’re ready to move on to step 2!
Step 2 – Now draw more of his shoulders and armor
Now we will continue to add the body to your Boba Fett drawing while adding some details to it.
Use some curves to open up his armor which his neck will stretch out at the start. Then use some lighter curves for the top of his shoulders.
You can also extend a line through the top of his chest to create the top of his armor.
There will also be some extra armor on his shoulder on the right. Once all these aspects have been drawn, finish by adding some weather details to the sections that you have drawn so far.
Step 3 – Next, draw the details for his armor
Boba Fett has a pretty detailed set of armor he wears, and we’ll be drawing the chest plate in this step of the Boba Fett tutorial.
There’s a lot of detail packed into this chest piece, so you’ll definitely want to refer to the reference image carefully as you draw.
The armor is made up of several shapes that come together to form the pattern you see in the image.
There are a few small marks embedded in there, and then you can finish off by adding some scratch and battle damage marks on the surface. Then it will be moved to step 4!
Step 4 – Now draw the contours of his helmet
Perhaps the most recognizable part of Boba Fett’s appearance is his iconic helmet. No Boba Fett drawing would be complete without it, so we’ll add it now!
Using the reference image as your guide, you can use some circles for the outline of the helmet. The helmet will also have a T-shaped hole in the front.
The final aspect to add would be the slideable visor on the left side of the helmet. There will be a gap left at the base of the helmet, but we’ll fill that in shortly.
Step 5 – Add Final Details to Your Boba Fett Drawing
You’re almost done with this painting and we only have a few more details before you move on to the final step of this Boba Fett tutorial.
The details that we will be adding will mainly include some details about the damage and battle damage on his helmet and armor. You can also use a small line to draw the base of the helmet.
Once you’ve added all these details, you can also add some elements and details of your own!
One idea would be to paint the background and you can recreate your favorite Boba Fett scene or create a whole new one. How would you complete this drawing of Boba Fett?
Step 6 – Complete Your Boba Fett Drawing in Color
The final part of the Boba Fett drawing is where you can finish him off with some color!
In our reference image, we used the classic color palette that Boba Fett featured in his various appearances. That means we used some green, yellow and red for his helmet and armor.
If you want Boba Fett to look exactly to the film, then you can reproduce the colors as we used in our image.
We can’t wait to see what colors, art tools and vehicles you use to finish off this famous bounty hunter!


