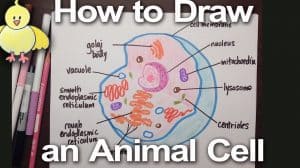
How To Draw An Animal Cell easy with this how-to video and step-by-step drawing instructions. Easy drawing tutorial for beginners and everyone.

Please see the drawing tutorial in the video below
You can refer to the simple step-by-step drawing guide below
Step 1
For this tutorial on how to draw an animal cell, we will first draw an outline. As you draw this plot, try to think of it as a large round cake taken out of a large slice.
You can then start this by drawing two curved lines and one will be more vertical while the other will be at a more horizontal angle.
As seen in the reference image, these lines would form the open interior of the animal cell. You can then use another curve on the outside to join both of these curves.
This will form the outer layer of the animal cell. Then you’ll be ready to move on to step 2 of the tutorial!
Step 2 – Now draw more interior details for the animal cell
In the second step of your animal cell drawing, we will add some more details to the inside of the animal cell.
First, we will draw the outer membrane that surrounds the cell. To do this, simply draw a line that runs parallel to the opening of the plot you drew in the previous step.
As seen in the reference image, this will show the outer coating of the cell. Then we will draw some details inside the opening.
Simply draw some thin, curved shapes located inside the cell. They won’t be detailed for now, but we’ll add some details to them in the following steps.
Step 3 – Next, draw some more interior details in this step
For this third step of the tutorial on how to draw an animal cell, we will add more details to the inside of the cell.
For the top half of the inner part, we will draw some small circles. Then for the bottom part of the interior you can add some little circles and circles along with some really irregular shapes.
As shown in the reference image, you should do your best to keep the space between the animal cells, as we will add some more to that later.
Step 4 – Now, start drawing more details
We’ll start adding details and final elements in this and the next step of our drawing of animal cells.
For now, we’ll add some curvilinear shapes that connect together near the center of the animal cell.
These will form what are called ribosomes, and they will surround the central nucleus of the animal cell that you will end up with in the next step.
You can then finish this step by drawing some more of the zigzag, irregular shapes you drew in the previous step.
Finish them off by adding some curve details inside the shapes, and then you’ll be ready for the final details in the next step.
Step 5 – Add the final details to your animal cell drawing
You are now ready to complete the final details and elements in this step of our how to draw an animal cell tutorial.
First, we will draw the nucleus in the center of the cell. The kernel is round, and it will also have a section cut out to show the nucleus in its center.
Once you’ve finished drawing, you can draw a line through the interior to show where the section was removed.
Finish by drawing more ribosomes around the top of the nucleus, and then finish with some smaller details throughout the cell.
Once these details are drawn, you can complete them with your own embellishments! Maybe you can look up animal cell diagrams and label your own cells! How will you end it?
Step 6 – Complete your animal cell drawing in color
In this final step of the animal cell drawing, you’re ready to finish it off with some color.
When coloring in cross-sections of animal cells like this, bright colors will usually be used to distinguish all aspects of the cell.
We took that approach in our own images, and we used different colors for different aspects of the animal cell.
You can use a similar color scheme or use some unique colors of your own!
You may want to use a medium that gives you as much precision as crayons or pencils when coloring, but whatever you use will look great!
Your animal cell drawing is done!
That should finish this step by step tutorial on how to draw an animal cell!
Drawing diagrams like this can sometimes be a bit tricky, so we hope that by breaking it down into smaller steps we’ve made it much easier for you.
Once you’ve finished this tutorial, remember that you can also put your own goals in it by adding your own details, elements, and ideas.
Changing the colors and mediums you use can also be a great way to create your own charm!
Then, when you’re ready for your next great drawing tutorial, you can check out our gallery on our website.


