How to Draw A Mockingbird easy with this how-to video and step-by-step drawing instructions. Bird drawing tutorial for beginners and kids.
Please see the drawing tutorial in the video below
You can refer to the simple step-by-step drawing guide below
Step 1
For the first step of the mockingbird tutorial, we will draw the bird’s head and beak.
For the top of the head, we’ll use a curved, almost completely horizontal line. This will attach to the beak, and the beak is quite thin and pointed.
Next, attach another curved line going down from the beak to the beginning of the neck.
For the eye, draw a small circle, then draw an even smaller circle inside it.
Then we’ll draw some corners around the eye area and you can create some texture by adding small lines near the shape.
Once all of this has been drawn, we’ll be able to move on to the second step of the tutorial.
Step 2 – Now draw the back and tail of the mockingbird
You have completed the first part of your mockingbird drawing, and now we can start drawing the body.
The bird’s back will be long and slightly curved when extending from the base of the neck. This tail will then curl itself as it turns into the thin, pointed tail of the bird.
Once the tail contour is drawn, we’ll also add some small curves inside it to add some feathered texture detail. Then it’s time to move on to step 3 of the tutorial!
Step 3 – Draw the beginning of the wings for the mockingbird
Mockingbirds have rather short wings to accommodate their small bodies, and we’ll be drawing the first part of the wings in this third step of our how to draw a mockingbird tutorial.
The front of the wing can be drawn with some curves, and for the back edge we will use smaller curves to make the wing look more like a feather.
We’ll also add some feather detail to the inside of the wing, and then we’ll also paint some more of this on the inside of the wing as well.
Then we can start drawing more of the bird’s body in the fourth step of the tutorial.
Step 4 – Next, draw the body and the rest of the wings
The fourth part of your mockingbird drawing will help you add the body as well as complete the wings.
For the back of the wing, you can draw some sharp curves to make it look like there are feathers sticking out.
As mentioned earlier, the wings of this bird are not very large, and it will just stick out slightly from the body contour.
You can then finish this step by drawing the body of the bird.
You can use a slightly wavy line for the belly, then draw a sharp little shape for the top of the leg, where the leg will stick out from the fur.
Step 5 – Add the final details to your mockingbird drawing
We can now complete the drawing to get you ready for the final step of the mockingbird tutorial.
First, we will draw the legs of the bird. Like many small birds, mockingbirds have very thin little legs and you can pull them down from the feathers at the base of their body.
The legs will then have horizontal lines drawn on them to give them a crow’s foot texture.
Finally, use some simple, slightly curved lines for the branch on which the bird is perched. Once these aspects are drawn, feel free to add any additional details of your own!
What kind of wonderful background can you think of for this beautiful painting?
Step 6 – Finish drawing a mockingbird with color
The final step of your mockingbird painting will help you perfect some color.
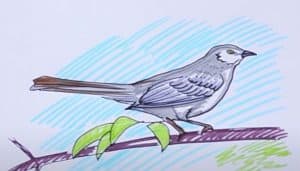
In the wild, mockingbirds aren’t exactly known for their bright color schemes, so in our reference image we kept things looking more realistic.
That means we used a light blue color with the darker areas and then some white for the belly of the bird.
Even if you want to use actual similar colors, you can add some color variation by coloring in some of the background elements!
You can also get variety by varying the art tools and media you use for color. We can’t wait to see how you complete this drawing!
Your mockingbird drawing is done!
You started this mocking bird tutorial want to learn how to draw this cute bird and now you have a great drawing to show off!
When drawing realistic birds, there can be a lot of challenges involved as you try to get all the details right, so you should take extra pride in your painting!
Now that this painting is complete, you can continue with your own details and ideas.
We’ve already covered how you can background the image, but you can even draw some birds to go with it! What do you think you will do to end this?
With this drawing mastery you can visit and find some more great drawing tutorials on our website to enjoy. We upload new ones regularly, so be sure to check back often!
