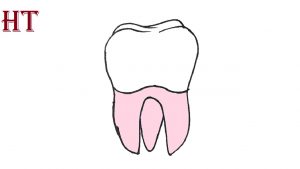
How To Draw A Tooth easy with this how-to video and step-by-step drawing instructions. Easy drawing tutorial for beginners and kids.

Please see the drawing tutorial in the video below
You can refer to the simple step-by-step drawing guide below
Step 1
For the first step of the tutorial on how to draw a tooth, we will start with the top of the tooth.
You can draw this part of the tooth using some curved lines joining the ends of the teeth.
This will form the surface of the tooth, and then we can move on to the next part in part 2 of this tutorial!
Step 2 – Next, draw the OTHER surfaces of the teeth
We will add some more surfaces to your tooth drawing in this second part.
This step is really easy for you to do, as all you need to do is draw two more connecting curves on top of the others you did in the first step.
Once you’ve drawn these lines as they appear in the reference image, move on to step 3.
Step 3 – Draw the tooth roots in this third part
Teeth won’t stay in the mouth very well without the roots, so we’ll draw them in the next section of the teeth drawing tutorial.
We usually don’t see these roots when they are attached to our gums and jaws, but they have a rather distinctive appearance. The tooth has several of these roots, and we’ll add the first two to this section.
Luckily, these originals are pretty simple to draw! Stretching the lines you drew earlier, we’ll add some sharper curves to form the two roots.
They will have sharp points but rounded ends to give them a more realistic look. That should complete a general outline for the tooth, but we still have some details to add as we move on.
Step 4 – Now draw another root for your tooth drawing
As we mentioned in the step of drawing your anterior teeth, teeth often have more than two roots. For that reason, we will add a third section to this section.
This should also be pretty simple to add, as you just need to add another long curve between the other two roots to create a third line between them.
Once that root is added, you’ll have completed the complete outline of your tooth drawing.
Before you start coloring your picture, we just need to add a few more details in the next step.
Step 5 – Finalize the final details of your tooth drawing
Earlier we talked about how we usually don’t see the root of the tooth and we are going to add some details to separate the tooth into what we see and what is hidden.
To wrap up this step of the tutorial on how to draw a tooth, we’ll add a wavy line near the center of the tooth to show what will be flooded by the gums and what won’t.
With that line, you’re pretty much done with drawing your teeth and ready for the next one!
Before you move on to the final step, here’s your chance to add any additional details of your own to really finish it off.
There are so many creative ways you can go about this drawing, and we’re going to go over a few of them right now!
You can draw more gums and even more teeth next to it. Or you can search the cross-section of a tooth and draw a section to reveal the different layers of the tooth.
You can even draw a face over your teeth for a whimsical look! These are just a few ideas, but what else can you think of to end this image?
Step 6 – Complete your tooth drawing with some color
The last part of the tooth drawing is where you can finish it off with some awesome colors!
You may think a tooth doesn’t give you much time to color it, but there’s so much you can do!
In our reference image, we used several shades of pink for the root underneath the tooth, and then we used different pale shades of gray and white for the surface of the tooth. tooth.
By using different shades of these colors, you can create a more dynamic look of textured detail to the drawing.
You can also use any other color you like for a more stylish look or color in any extra or extra details you may have added.
We’d love to know what colors, artistic mediums and techniques you used to complete this tooth drawing!


