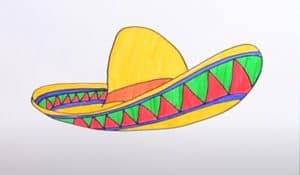
How To Draw A Sombrero Easy with this how-to video and step-by-step drawing instructions. Simple drawing for kids and everyone.

Please see the drawing tutorial in the video below
You can refer to the simple step-by-step drawing guide below
Step 1
To start this sombrero tutorial, we will draw the wide brim of the hat.
This rim will have a rather specific shape and you can draw the top by drawing a curved, wavy line.
The edges will be slightly diagonal, and then the bottom of the rim will also be wavy, just slightly less than the top line.
You can draw the back of the border with a smaller curve before moving on to the next step.
This contour can be a bit tricky to draw, so be sure to refer to the reference image carefully as you draw so you can get the curvature you want.
Step 2 – Now draw the top of the hat
You have completed the outline of the sombrero, and now we can start drawing the top of the hat.
The top of the sombrero is as special as the wide brim of the hat, as it is rather tall and thin compared to that wide brim.
To draw the top part of the guitar, you can use a curved line to create this curved part. The top of the hat will be a bit flatter but still have a slight curve.
You can then finish this step by drawing the opening below the brim with another curved line. Then it will be in step 3 of the tutorial!
Step 3 – Draw the first decorative elements of the sombrero
Now the outline of the hat is complete and we can spend the next few steps of this tutorial on how to draw a decorative sombrero for the hat itself.
To begin with, we’ll focus on the top of the hat. All you need to do is draw some horizontal lines on the top part of the hat.
That’s all there is to this step and now you can move on to step 4 of the tutorial!
Step 4 – Next, draw some more decorative elements for the hat
Continuing with this sombrero drawing, we will add some striped details to the hat.
These next details will focus on the brim, and like the top, the lines will traverse along the brim.
However, these lines will be much longer and dimmer than those lines.
Once you’ve added these embellishments, you’ll be ready to finalize the details and elements in the next step of the tutorial.
Step 5 – Add the final details to your sombrero drawing
As we mentioned in the previous step of the sombrero tutorial, this step will be all about perfecting the details and final elements of the hat before you finalize it with some color.
You’ll also be able to add your own additional ideas and elements, but let’s finish the design first.
To do this, we will draw some jagged lines between the wavy lines drawn on the rim that you added in the previous step.
This will create a kind of zigzag pattern that adds character to the hat’s design.
Then you’ll be ready to finish with some more of your own!
There are lots of fun ideas you can work on, and these ideas could include drawing someone wearing a hat or maybe designing the background behind it.
These are just two ideas, but what creative ideas can you think of to end it?
Step 6 – Finish your sombrero with color
It’s time to relax with coloring fun when you finish this sombrero drawing.
In our reference image, we used a combination of light brown along with some green and red for the various decorative elements of the hat.
Here are some colors that you can use, but you should also feel free to add your own color ideas or maybe even use completely new ones!
Once you know which colors you like, you can also have a little fun choosing the tools and art media you’ll use.
There are so many amazing colors and mediums you can choose from, so have fun with it and see what you can do when you finish this amazing painting!
Your Sombrero drawing is done!
That’s it, you’ve completed all the steps in this sombrero tutorial!
Drawing objects like this can be quite complicated due to the curvature of different parts and smaller details.
Hopefully by using this guide you find it a fun and easy experience despite these challenges!
Now that it’s done, you can take it even further by adding your own details, ideas, and elements.
We’ve only covered a few ideas you can try while doing this, but here’s one step where you can let your imagination run wild!
Then if you liked this tutorial, you can find more on our website. There’s a lot to choose from with more to come soon, so stay tuned to enjoy more tutorials in the future!
You can also show us how your sombrero will turn out by sharing it on our Facebook and Pinterest pages when it’s done!


