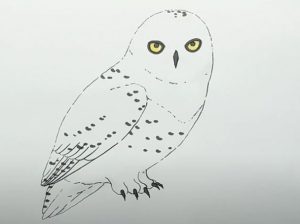
How To Draw a Snowy Owl easy with this how-to video and step-by-step drawing instructions. Bird drawing for beginners and All.

Please see the drawing tutorial in the video below
You can refer to the simple step-by-step drawing guide below
Step 1
Let’s start the drawing tutorial on how to draw a snowy owl by drawing the head in the form of a circle and the body in the form of a large oval.
Step 2
Now use a few short, flowing lines to connect the head to the body. Now go to the lower body of this majestic bird and draw the silhouette of the tail.
Step 3
Then use a long smooth line to carve the edges of the wings. Then draw the feathers using short lines. Remember that you can check the symmetry of your bird drawing by looking at it in the mirror.
Step 4
Further, go to the head and draw almond shaped eyes. Then go a little lower and draw a small beak, this beak should be in the center of the face.
Step 5
Now go to the bottom part of the torso and draw the legs. You can also check the symmetry of your owl drawing by turning it upside down.
Step 6
Continue the lines from the previous stage to draw sharp toes and claws. You can depict some feathers on the bottom of your feet.
Step 7
To make the bird drawing richer and more realistic, paint textures on the feathers. Be sure to account for the curves of the owl’s body to make the artwork look more massive.
Step 8
Now, very carefully, remove all construction lines from your snowy owl drawing. Alternatively, you can darken the necessary lines, to make the artwork sharper.
Step 9
We paint the owl light gray, almost white. We used gray for the beak and yellow for the eyes. To give the owl a little dimension, add shadows in places that are not illuminated by light.
Try to include some extra details to make your bird drawing more interesting. For example, you can draw backgrounds, some plants and animals.


