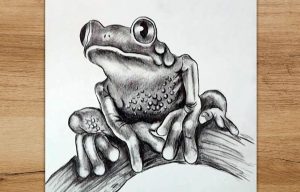
How To Draw A Realistic Frog easy with this how-to video and step-by-step drawing instructions. Pencil drawings for beginners and everyone.

Please see the drawing tutorial in the video below
You can refer to the simple step-by-step drawing guide below
Step 1
For this drawing, I used a 4H pencil for highlights/lines, pencil B for shading/general lines, and an 8b pencil for rough shading/background shading. The 8B pencil is a personal favorite of mine; 6B or 4B pencils can also get the job done.
Step 2
First things first, let’s start with a very basic sketch of the frog. Try to build your sketch with basic shapes: circle, oval, triangle, rectangle. Since the shape of the frog is so round, I used basic circles for my sketch. I always find it easier to start with a shape for the head and then build around it. I used pencil B for this step but any pencil will do as long as you sketch lightly.
Step 3
Start defining your forms using the same pencil. Make your lines a little darker. Start with the head and work your way up. Right now, you should only worry about defining features (eyes, nostrils, lips), don’t add any shading.
Step 4
Identify the frog’s left leg and chest area. Again, don’t capture the details.
Step 5
Identify the remaining front legs of the frog. Remember that one foot will appear larger than the other due to the viewing angle; Closer objects always appear larger.
Step 6
Now define the back and hind legs. I shaved the back a bit so my frog looks like a Quasimodo. If you see anything messy on your sketch at this point, delete it and fix it!
Step 7
Here, I used an 8b pencil to shade around the background and the wood that the frog is chilling. Play pay attention to line direction here. This shouldn’t matter much for the background but make sure your lines run parallel to the edge of the wood.
Step 8
Now, I used the same 8B pencil to roughly shade the frog’s head and surrounding background. You want to make sure your shade is very light. This class is meant to be built upon. You will be able to easily shade, erase and blend this layer.
Step 9
This step looks like a hug jump but it really isn’t. Start by defining the outline of the tip with pencil B, then create the background with an 8B pencil. I start by detailing the frog’s eyes. Start by using pencil B on the darkest lines/shadows. If you need a darker shade, use an 8B pencil. I used the 4H pencil for the eyelids and skin. If the 4H pencil doesn’t create enough shadows, use the B pencil. The easiest way to create the rough texture of the skin is to make rounded strokes. You can use a kneaded eraser to select highlights or light blends.
Step 10
Now use the 8B pencil to shade almost in the lower right quadrant of the drawing. Build on wood, platform, frog legs and chest area.
Step 11
Use the 4H pencil to define the legs and bust a bit. Instead of pressing down too hard with 4H to create dark values, try switching to pencil B and shading lightly. Don’t forget the darkness! For the wood part, start hinting at the shadow the frog is creating using pencil B. Create the wood grain with the 4H pencil. Remember to pay attention to the line direction!
Step 12
Use the 8B pencil to shade the front and back legs. Building on wood is fine.
Step 13
Create your shading a bit using the 4H and B pencils again. Pay attention to the position of the ball. Don’t go into too much detail with your shaders.
Step 14
Build your background using your softest pencil. This is the main reason why I chose the 8B pencil for this drawing. I want to have a very dark value in the background to make the frog pop out a bit more. You can also use the same pencil to shade the frog’s back and hind legs almost shadow. Build the wood grain.
Step 15
Heard I made shadows on the frog’s back and hind legs using pencils B and 4H. Try your best to simulate the bumpy texture on the frog side.
Step 16
Now it’s time to complete. Figure out where you want to start and work from there. I started by defining the outline of the frog’s leg and its shadow. Then I used the 4H pencil to create some more pieces of wood. You can also use a B pencil on the wood to add some variation. After finishing the wood, I added a final layer of shade to the frog legs. This is mainly related to 4H pencils. I only use the B pencil on the darker areas. Then I sketched my frog with pencil B and finished my background with pencils B and 8B. From there, I just added the finishing touches to the body using mostly the B pencil. If you find your shadow color too rough or too varied on one area, you can use a little tissue paper. for light mixing. Once you have added all the details, you can call the drawing done! I hope you all have fun with this one. Let me know how it affects you!


