How to Draw A Mistletoe easy with this how-to video and step-by-step drawing instructions. Learn to draw for beginners and kids.

Please see the drawing tutorial in the video below
You can refer to thsimple step-by-step drawing guide below
Step 1
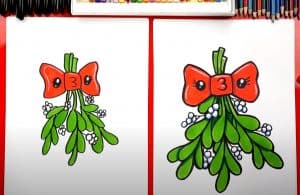
Mistletoe usually has a pretty bow tied around it and that’s what we’ll be drawing in the first step of the mistletoe drawing tutorial.
First, you can start by drawing a small, rounded rectangle for the center of the bow.
Then there will be two strands coming out from the bottom of the bow that will be thin at the top and a little thinner as they go down.
Then there will be two large pieces coming out from the side of the button and drooping slightly.
Finally, you can draw some small and thin strands of mistletoe sticking out of the bow. Once you have these aspects in place, you’ll be ready for step 2!
Step 2 – Draw the details for the bow and add the mistletoe
In this drawing of your mistletoe we will add some details to the bow and also some details of the mistletoe.
Starting with the bow, you can draw some curves and slivers onto the bow, as shown in the reference image. This will help show both the folds on the ribbon fabric and also where it repeats itself.
Then we’ll draw some thin stems from the mistletoe. On these stems you can then draw some small round berries along with some round leaves sticking out of them.
Step 3 – Next, stick some more leaves on the mistletoe
For the next step of the mistletoe drawing tutorial, we will be adding more mistletoe.
Mainly for this step we will draw some more leaves on the tree. The leaves of the mistletoe are quite large and rounded at the ends, as shown in the reference image.
You’ve drawn a few smaller ones before, but these will be significantly larger.
Step 4 – Continue adding some large leaves
Your mistletoe painting looks really great! We will continue to add volume to the tree by drawing some more leaves.
You can extend the stem on the left side of the mistletoe for this part, then add more large round leaves to it.
This is the step where you can also add more or less leaves depending on your preference.
Once you’ve drawn these leaves, there will only be a few more leaves to add in the next step!
Step 5 – Now you can add some final leaves to the mistletoe
In the fifth step in this mistletoe drawing tutorial, you’ll see you add the final leaves to your painting. These leaves will be under the cluster of leaves on the right hand side to finish it off beautifully.
Like the previous step, you can also change the number of leaves more or less depending on your preference. Then you are ready to continue!
Before you do, however, there are a few extra details you can add to take this drawing even further. Some examples might be to draw the background and there are many examples that you can use to do this.
The mistletoe is a Christmas ornament, so you can choose a real subject for this drawing. You can paint your favorite Christmas decorations or even add a Christmas tree near the mistletoe. Maybe you can even paint yourself and that special someone getting ready underneath the mistletoe!
These are just a few ideas, but what else could you think of to complete this amazing drawing?
Step 6 – Finish your mistletoe drawing with some colors
Your mistletoe painting now looks great once you’ve added all the final details, but one thing is still missing: some great colors! In our reference image, we kept the colors nice and realistic with some more muted green and white for the mistletoe.
Then we go with a nice Christmas red for the bows around the mistletoe. However, this is just one way you can color this picture!
You can change the color of the bow or even the mistletoe itself. If you’ve drawn in any additional background or element details, you can have fun adding color to those as well.
The medium you choose can also have a big impact on how you present the colors you choose.
You can also add some crafts like glitter or glitter glue to add some Christmas magic! What color and art medium are you thinking of using for this mistletoe painting?


