How to Draw A Milkshake cup easy with this how-to video and step-by-step drawing instructions. Simple drawing for kids and everyone.

Please see the drawing tutorial in the video below
You can refer to the simple step-by-step drawing guide below
Step 1
When ordering a milkshake, it usually comes in a tall glass, and this is where we’ll start in the first step of our tutorial on how to draw a milkshake.
For this first step, you’ll need a ruler if you want to make sure the lines are perfectly straight.
For the sides of the glass, we’ll draw some long straight lines, going up a bit at an angle.
Then draw some curves for the base of the glass, and then add another curve around these lines for the rest of the base.
We’ll leave the top of the wine glass for now, as we’ll be drawing the milkshake into that space soon.
Step 2 – Now draw the beginning of the milkshake and more of the glass
This step in your milkshake drawing will see you begin to draw the drink itself! To start, we will draw a curved line through the opening of the glass.
This line will curve inward at the ends, and it will extend slightly beyond the edge of the glass.
Then we’ll draw some more lines along the inner circumference of the faces of the glass.
They can be connected at the bottom by another curve, as shown in the reference image. Then you’ll be ready for the third step of the tutorial!
Step 3 – Draw the top of the milkshake on top
Next, we’ll draw the top of the drink in this step of the milkshake tutorial.
This can be started by using some horizontal curves to make it look like the milkshake has curdled on its own.
Then for the top of the milkshake we will use a pointed curve and this will show where the milkshake dispenser has stopped flowing.
There will be a small amount of space left at the top of the milkshake, as this is where we will add some top layers in the next step.
Step 4 – Next, draw the first part of the top layer
Having a delicious milkshake is one thing, but it can be even better when you add some delicious toppings to the mix.
We’ll be adding some of these delicious toppings to your milkshake drawing in this step.
The ones that we show in the tutorial are just some examples of what you can do, but you can also add some unique overlays of your own!
For us, we added a circle to the empty space you left in the milkshake in the last step. This will have a stem part split to form a cherry sitting in a cup of milk.
Then we’ll draw a rectangle that sticks out from the top left. This will have diagonal lines along it, and this will be a protruding wafer.
Then you can proceed to the final details of the drawing in the next section!
Step 5 – Add Final Details to Your Milkshake Drawing
To complete this picture before the last step of the milkshake tutorial, we will add a few final details.
This milkshake needs something to help consume it, so you can use some straight and curved lines to draw a bent straw with stripes sticking out.
Then you can end up with some small circles on top of the milkshake for some sprinkles. With the added stuff, you can also paint some more of your own!
Adding a background is one idea, and if you did, what would you draw to enjoy this milkshake?
Step 6 – Complete your milkshake drawing in color
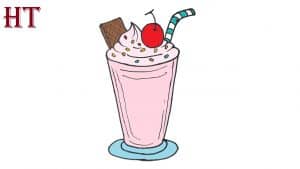
Now it’s time to finish this milkshake drawing with some color! With a drawing like this, color is especially important as it helps identify the type of milkshake.
In our reference image, we used some shades of pink to the milkshake itself to suggest that this is a strawberry flavored milkshake.
Then we used a nice deep red for the cherry above, some brown for the wafer, and a blue with white stripes for the straw.
Finally, we used various bright colors for the sprinkling. Would you use a similar palette for your own painting?
This is your chance to show off your favorite milkshake flavor with the colors you use, so have fun getting creative with it when you’re done!
Your Milkshake drawing is done!
That should wrap up this tutorial on how to draw a milkshake, and we hope that the process helped quench your creative thirst!
Drawings like these may sound simple at first, but there are certain elements that can certainly prove to be harder than expected.
With the help of these steps, we also hope that it becomes more enjoyable and enjoyable for you!
Now that you know the basics, it’s your chance to create a brand new design of your own! You can do this by adding toppings, ingredients, and other details to create your own ideal milkshake.
Combined with the colors and art media you can use, you have unlimited potential for how to perfect it!


