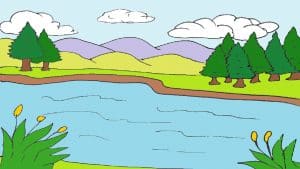
How to Draw a Lake scenery easy with this how-to video and step-by-step drawing instructions. Scenery Drawing tutorial for beginners and kids.

Please see the drawing tutorial in the video below
You can refer to the simple step-by-step drawing guide below
Step 1
Start by drawing a long and curved line. This outlines the lake shore.
Step 2
Draw another long curved line parallel to the first one. This gives the shore a three-dimensional appearance. Draw some inverted, overlapping “V” shaped lines in each corner of your page. This is the grass and trees at the water’s edge. From a set of trees, draw long straight lines. Draw a small oval at the top of each line, followed by a shorter line. This shows the seed heads of the cattail plant. Next, draw wavy lines to create ripples for the water surface of the lake.
Step 3
Draw a line through the top of the artboard, just above the shoreline. This is the horizon.
Step 4
Draw a pair of pine trees, erasing existing lines if necessary. For the upper part of each tree, enclose a triangle using short lines that meet at points. Extend parallel lines to form the trunk, and join them at the bottom.
Step 5
Draw additional pine trees, which are behind and partially obscured by the first pine.
Step 6
Draw more pine trees on the opposite side of the figure. Again, enclose the quasi-triangle shape using short lines that meet at points. Use parallel lines for the trunk, and join them at the bottom.
Step 7
Use a long and curved line to draw the mountains in the background.
Step 8
Use some overlapping curves to draw more mountains in the background, higher than the first image.
Step 9
Draw fluffy clouds in the sky. Create the bottom of each cloud using a horizontal line. Then layer “U” shaped lines on top of it to enclose the shape of the cloud.
Step 10
Color your lake scene.
You can set the setting for other stories, including fall scenes, woods, sunsets over the ocean, winter scenes, beaches or deserts found among the botanical and miscellaneous drawing tutorials ours.


