How To Draw A Jungle easy with this how-to video and step-by-step drawing instructions. Easy drawing tutorial for beginners and everyone.

Please see the drawing tutorial in the video below
You can refer to the simple step-by-step drawing guide below
Step 1
Dense forests often have a thick canopy that covers them which can be so thick that it is difficult to see the sun or the sky through it.
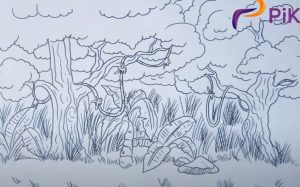
We’ll start by drawing this foliage in the first step of our jungle drawing tutorial. To do this we will draw a contour for the top of the tree which will be created using some bumpy lines.
Each bump of these lines will also have a very small rounded tip.
As shown in the reference image, there will be several parts of these canopy connected to each other.
Once you have drawn the tree tops, you can move on to the second step of the tutorial!
Step 2 – Now draw more trees in the forest
You have drawn the canopy for this jungle and now you are ready to add some more details to the trees in your forest drawing for this step.
To do this, we will draw a large tree trunk on the right hand side of the canvas. You can do this by drawing some circles to create a T-shape of the trunk.
Then there will also be a thick, twisted vines around the tree. There will be another branch to the left reaching out to the top of the tree, and this branch will also have a vine around it.
Finally, you can finish by drawing some more bumpy lines to get more canopy in the background.
Step 3 – Next, draw some more details for the forest
In this step of the how to draw jungle tutorial, we will add more to the ground of the forest while also adding some details to the trees that you have drawn.
First, use some more bumpy lines similar to the ones you used for the leaves of the tree to create some bushes in the background.
You can then add some lines and other small details to the bark to make them look more textured and realistic.
Finally, you can also add a few small leaves to the vines that wind around the tree to make them look a little more active.
Step 4 – Now, draw some more plant life
Continuing with your forest painting, we will add even more plant life and other details to the picture.
We will focus mainly on the foreground of the image in this step and you can start by drawing some large leaves on the left hand side.
To draw these leaves, use some curved lines with a pointed tip and then add some ridge detail on them.
Then we’ll use some sharp, jagged lines for the bunch of grass on the right side of the image. Then you’ll be ready for the final details in the next step!
Step 5 – Add the final details to your forest drawing
This fifth step of our how to draw a forest tutorial will help you finish some final details to really finish it off before you add some color.
First, we’ll add some detail to the vines twisted around the tree to make them look more textured.
To do this, simply add some small curved lines onto the vines, then draw some small dots in between these lines.
Next thing we will add some lines to the ground of the forest. Once they’ve been drawn, you’re ready for the final step!
Before continuing, you can add a lot of things to personalize this photo.
The forest is full of life, so you can include some details like tropical parrots, jaguars or monkeys or more in your drawings. How would you complete this lush picture?
Step 6 – Finish your forest painting with color
Now you are ready to complete this jungle painting by adding some amazing colors to it!
To color our example image, we used various shades of green and blue for the leaves, grass, and other forest elements.
By using as many different shades of the color scheme as possible, you can create a more dynamic look for your forest and make it look even more glamorous.
You can also help create this vibrant look with art media of your choice.
You can use painting mediums like acrylic paints and watercolors, or use crayons and brushes to get some ideas. What will you use for your forest painting?


