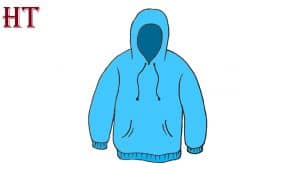
How to Draw A Hoodie easy with this how-to video and step-by-step drawing instructions. Easy drawing tutorial for beginners and everyone.

Please see the drawing tutorial in the video below
You can refer to the simple step-by-step drawing guide below
Step 1
To start this tutorial on how to draw a hoodie, let’s start with the piece of clothing it takes its name from: the hood!
This will be a pretty simple step, and we’ll draw in the hood by following a sharp curve that looks like in our reference image. Once drawn, we can move on to the next step!
Step 2 – Now, start with the sleeves of the hoodie
With the hood drawn, you can now start drawing the arms of your hoodie drawing. For the left arm, just draw a line from above where the left side of the hood ends.
The line for this arm will curve sharply before heading up to the hood again. After completing that arm, you can repeat the process except reflected on the right hand side.
Step 3 – Next, add the body to the hoodie
Now that you’ve finished the hat and arms, you can move on to the body of your hoodie drawing! Here’s another step that shouldn’t be too difficult if you’ve made it this far!
Using the reference image as a guide, the line for the body of the hoodie will start from under the arms.
It should almost touch the top of the arm line, but there should be some distance between the lines.
The body of the hoodie will have a rather rectangular shape, starting and ending under the arms.
Although the shape will be vaguely rectangular, make sure there is a slight curve in the corners of the hoodie.
Step 4 – Draw some extra features to your hoodie
In this step of the how to draw hoodie tutorial, we will add even more details to it.
Firstly, a hoodie is a bit pointless if it doesn’t have holes for your head to go through! We don’t want this to be a pointless hoodie, so add a hole to your hoodie drawing.
The shape of the hole will be rounded at the top, but end with a thinner and sharper point at the bottom of the hoodie.
Now that you have this important part of the hoodie, we’ll add some cuffs to the hoodie. To do this, simply draw some thin shapes up to the top of the hoodie’s arms.
Once done, you can draw in a similar shape to the bottom of the hoodie body. After it looks like the picture, you should go for some final details!
Step 5 – Now let’s draw some final details
Your hoodie drawing is almost done now! You’ll be adding some color soon, but before that, we should add some final details to your drawing.
First, use some wavy lines below the hole for the top to make the wire of the hoodie.
Then draw some slight curves into the body of the hoodie to make some pockets for it.
Finally, just draw some lines into the shapes you’ve created at the top of the arms and torso of the hoodie for some extra texture detail.
These are the final details that we will add, but feel free to add in any interesting details you would like!
Step 6 – Finish your hoodie drawing with some colors
The hoodie has been drawn, the final details have been added and you’re almost at the end of this hoodie drawing tutorial!
We hope that drawing your hoodie was fun, because at this step the fun just continues! For this step, you should let your creativity run wild and show us what you’re capable of!
We’ve colored our image with a pretty light blue, so here’s how you can use it! However, you shouldn’t let this limit you and you should choose any color you love!
Another fun way you can personalize your hoodie drawing is by adding a fun design to the front of the hoodie.
This can be anything from your favorite music artist’s logo, your favorite movie, or the face of a beloved pet!
What design and color do you think you will add to this hoodie? You might as well have a great time trying out some awesome art mediums like paint, watercolor or crayons for some amazing color details!


