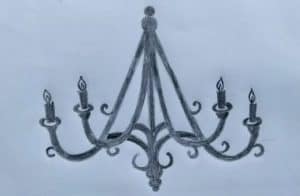
How to Draw a Chandelier easy with this how-to video and step-by-step drawing instructions. Easy drawing tutorial for beginners and kids.

Please see the drawing tutorial in the video below
You can refer to the simple step-by-step drawing guide below
Step 1
The chandelier is a long hanger that you have to start by drawing along the rope with 3 circles.
Step 2
Above the first circle draw 2 upward curved lines. Below draw 2 diagonal lines and then another small line above the center circle. From the top of the bottom circle draw 2 more diagonal lines.
Step 3
To complete the central part of the chandelier, draw an oval on top of it and in the lower part draw a sleek oval in the center. Alternatively, draw a funnel on the top curve.
Step 4
From the center of the chandelier, draw curved lines in an upward direction. The lines drawn should be even and equal on both sides.
Step 5
Draw flat ovals on top of each strand going upwards. They are again similar to yarn in numbers. Above these circles draw small circles.
Step 6
Draw pairs of lines in between the drawn ovals and the circles depicting the candles. On top of these flames draw flames using curves or teardrop shapes.
Step 7
On top of this chandelier draw a series of small ovals and curves forming the chain through which it is hung.
Step 8
Give your chandelier a finishing touch and remove excess.


