How To Draw A Beehive easy with this how-to video and step-by-step drawing instructions. Simple drawing for kids and everyone.

Please see the drawing tutorial in the video below
You can refer to the simple step-by-step drawing guide below
Step 1
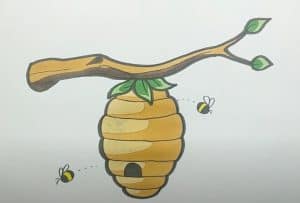
A beehive is usually hung from a tree branch when found in the wild, and that’s why for this honeycomb tutorial we’ll start with the branch.
To draw this branch, we will use some soft but slightly curved lines for its outline. This will end up with two subdivided edges that have pointed ends at their ends.
Then, once you have sketched this branch, you can start adding some details to it. We’ll do this by adding some wavy lines to the branch, some of which will have a bit of twist in them.
These lines will help the branch look like it’s made of wood.
Once you’ve drawn this branch to look like our reference image, you’ll be ready to add some detail to it in the next step!
Step 2 – Next, draw some leaves for the branch
We don’t want the tree to look too dead, so in this part of your hive drawing we’ll add some leaves on it.
First, attach a bunch of three leaves to the bottom of the branch. Each leaf will be drawn with a number of curves culminating in a pointed tip.
Then each card will have a small line in the center of each card to add some detail.
Once you’ve got the hang of it, add another leaf to each end of the split branch. In the next step, we will start drawing the hive!
Step 3 – Draw the first part of the hive
Now that you have a branch for your drawing, you can now start drawing the star of the drawing for this third step of our honeycomb tutorial!
The hive is made up of several parts and you can extend them down from a cluster of three leaves.
Draw two small curved lines from these leaves, then draw two more lines moving outward from the top of the hive.
There will also be some curves going from left to right from each side of each section of the hive. That’s all that needs to be done for this step, so let’s move on so we can continue adding to the hive.
Step 4 – Now, draw the bottom half of the hive
You did a great job on the first part of your honeycomb, so this part of your drawing should not be difficult at all!
For this bottom half, you’ll basically do what you did in the previous section, which is to draw the different parts.
In the previous step, the sections were wider as you went lower, but now they will start to narrow.
Once you’ve finished drawing the honeycomb outline, you can then add a circle back into the third from the bottom for the hole.
Then just add some detail and final color, both of which we’ll see in the last two steps!
Step 5 – Complete your honeycomb drawing
Now it’s time to finish painting in this step of our honeycomb tutorial. This will get you ready for the final step where you will color!
First, we add some curvilinear detail to the parts of the honeycomb to give them a little more depth.
Then we add something every hive needs: bees! We’ve drawn two small bees buzzing around the hive, and for extra fun we’ve added a trail of small lines behind them to show their path.
You can also add some details of your own before continuing! If you think this drawing lacks bees, you can add as many as you want!
You can also draw a background to indicate what kind of setup the hive is in.
How will you finish your painting before the final step?
Step 6 – Finish your honeycomb drawing with some colors
This is the final step of your honeycomb drawing and this is where you can finish it off with some awesome colors!
We used some lighter golden yellow for most of the honeycomb, and then we incorporated some darker shades to shade the sides of the hive.
Then we used some light brown and green for the branches and leaves that the hive was hanging from.
These colors are what we have chosen, but you can use any color choice that appeals to you! Then you have a lot of options for different art media and tools that you can use to achieve them.
Be sure to have a lot of fun expressing yourself with color!


