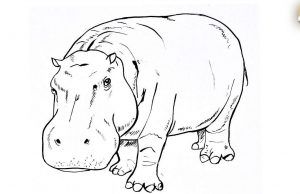
Hippo Drawing easy with this how-to video and step-by-step drawing instructions. Wild animals drawing for beginners and kids.

Please see the drawing tutorial in the video below
You can refer to the simple step-by-step drawing guide below
Step 1
Okay, the first thing you’ll do is create two circles. A regular circle for his head and an elongated circle for his body.
Step 2
Next, draw the lining for the bottom half of the nose/mouth. This part of the sketch looks like a butt. Then draw two more circles for the hippo’s legs. If you notice on the back of the sketch start shaping his body.
Step 3
As you can see, the hippopotamus has stout legs, so the circles you draw for its legs are actually the background for its paws as well. Move to the face and give the hippo some nostrils and one eye. In this sketch, he closes his eyes.
Step 4
What you will do in this part of the drawing is define his head and start adding some blubber to his neck and hind legs.
Step 5
Add more light pink details to the hippo’s neck and add ears so it can hear.
Step 6
As you can see the hippo is forming. and actually done all you do here is add more high definition toenails and remove the framing lines from your sketch.
Step 7
There you have a finished hippo, all you need to do here if you want is to color it. After all is done, you will come out with this finished product. Good job


