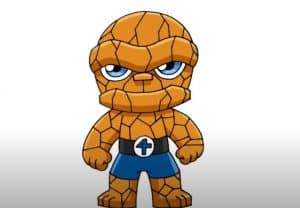
How to Draw the Thing from Fantastic 4 with this how-to video and step-by-step drawing instructions. Easy drawing tutorial for beginners and everyone.

Please see the drawing tutorial in the video below
You can refer to the simple step-by-step drawing guide below
Step 1
Let’s start with a stickman (as in all of our drawing tutorials). At first we draw the head in the shape of an ordinary circle. Then outline the contours of the body: neck, shoulders, spine, arms and legs. Note that Thing’s head is larger and wider than that of a normal human. In addition, his body was much wider than that of a normal man. Again, this step is only needed to locate the hero on a piece of paper, and so we need to use very light lines in the first step.
Step 2
Now we add volume to the Thing, by drawing the body parts using simple geometric shapes. First outline the contours of the torso. Outline the shoulders and elbows with circles and the arms with cylinders. Sketch a four-fingered hand, clenched into a fist. Under the torso draw the pelvis in the same shape as a triangle.
The leg should be drawn according to the same principle as the arm (using the cylinder) and the top knee in the same way, the knee and the elbow (using the circle).
In the same step, mark the face with a pair of perpendicular lines – the vertical line shows the symmetry of the face and the horizontal line shows the position of the eyes.
Step 3
Now, using the markup from the previous step, draw a wide eyebrow, just below them (almost intersecting), draw the oval of the nose. Also slightly below the eyebrows draw the contours of the cheekbones, which look like the letter “T”. Under the cheeks draw a large lower lip – angled sloping line through the entire face.
Step 4
Silhouette of the Thing from Fantastic Four is ready, now you can start drawing details. In this lesson, we will add details, like in other drawing tutorials, in a top to bottom direction, i.e. head to toe. So now erase the unnecessary lines from the face. Draw the eyes (two semicircles, that outline with the brow line) and the mouth.
Step 5
So we continue the drawing lesson for how to draw Article from the Fantastic Four. This step is quite simple, here we delete all the guides, leaving only the most important lines, i.e. the contours of the body. Make these lines smooth, like in our example.
Here we also draw Ben Grimm’s shorts, as well as the Fantastic Four logo. By the way, we also have drawing tutorials for the Thing’s allies (sometimes enemies) – for example, Thor, Iron Man, and Spider-Man.
Step 6
Now we draw the rock texture of the Thing. The main thing is, the stones should be drawn at random. If you try to make them look alike, it will look like Ben Grimm is made of bricks, and this shouldn’t be the case. In this step, we outline the rock pattern on the Thing’s head and body.
Step 7
So we’re at one of the final steps of our how to draw Thing tutorial. Guided the lines of the previous step draw the rock pattern on top. Please note that the only place where the stones should be the same – is Ben Grimm’s eyebrows.
Step 8
We do the same with Thing’s torso and arms. Circle the outer contours of the body to visually separate the arms from the torso. An important point – the stones on the chest must be more smooth and folded to convey the point. As we said, we’re looking at Ben from the bottom up.
Step 9
Draw according to the pattern on the leg. At the top, the stones have to be slightly bent, to convey the point. Another important point – as you get closer the base stones become smaller.
Step 10
In the last step, as in the other drawing tutorials, we add a drop shadow. And as in other drawing tutorials, dedicated to comics, the shadows here will be drawn in a comic style.
Draw the darkest parts of the shadow and paint the belt on the shorts. Then, using classic manga drawing, add shadows to the head, torso, and limbs. As you can see, the light is coming from above, so we add shadows to the undersides of the body parts.


