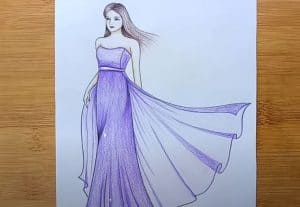
How to draw a girl with beautiful dress easy with this how-to video and step-by-step drawing instructions. Pencil drawing tutorial for beginners and everyone.

Please see the drawing tutorial in the video below
You can refer to the simple step-by-step drawing guide below
Step 1
First we need to set up a basic shape. The girl I drew was standing in a very basic cute girl pose with her hands clasped behind her back and her toes slightly turned inwards. To set a proper form, draw a basic circle for the head, try not to make it too small or too big .. keep it as wide as the circle at the shoulder. Draw circles at the shoulders and a line to indicate the position of the shoulder, a vertical line of the torso, and an upturned bowl with the feet of the club coming out from it.
Step 2
First, determine what her head will be like. Use the circle to make your anime chin and draw some guide lines for the face. It’s best to use the curve of the right (your right, not hers) of the circle and start embedding with the curves and then drag out to create the angle of the cheeks. This helps to create your head shape instead of just being a straight line.
Step 3
Using guide lines, draw on the outer part of the eyes, the nose (If your nose cuts across your head line like mine, you may need to redraw it later) and a smile. Keep your smile a bit taller than usual as her mouth will open.
Step 4
Now create circles or irises of the eyes. Create a low curve that touches the corner of your mouth and draw a small hill in your mouth for a smile. Under the low curve, draw a small curve to show the lower lip. Draw some eyelid lines above the eye.
Step 5
Now we want to delete the circle on the head, so let’s draw the top part of the bangs and the shape of her hair. Right on top of the bangs, there should be a slight curve and bulging to show the rest of the bangs being blown out of view. Pull the hair out of the head.
Step 6
Now you can delete your subject lines and guides, they are no longer needed. Even so, leave the neck and the rest of the body alone. Draw the rest of the bangs in the clip and a little bit of hair fall over the shoulder.
Step 7
I brightened my guide lines so that the lines don’t get confused. As you can see, I’ve drawn the sleeves of your sleeve not touching but hovering over your guide lines. Towards the bottom of the sleeve, stick it out slightly. Starting at the bottom of the shoulder circles, draw a curve outward and over the bowl upside down to create the waist and start of the dress.
Step 8
Before we continue, wish we could complete the whole upper body. Paint at the bottom of the hair part hidden behind the sleeve. Draw two tiny curved rectangles at the bottom of your shaggy sleeve and her arms hidden behind her back. Draw the neck and square neckline of the dress. If you’ve been looking at my chibi clothing tutorial, note that I use the same fastening technique for the neckline you can see. Clothes are not flat to her.
Step 9
Before we start the lower part of the dress, there are a few things you need to know about how the creases will work. Note that the blue line sets up how the creases will go. This is the bottom part of the dress and must-not be disconnected. The line must be continuous even when it reaches a sharp angle, with no line breaks or you will lose the desired effect. The red lines indicate how the outfit will develop around your connection line.
Step 10
The current! Try it for practice this time. Draw a line connecting the flowers, with a few lines coming from the upper points of the flow to show how the dress folds.
Step 11
Before we finish the underside of the dress, we need to put the feet and feet. Follow your stick guides to create your foot. If you’re having trouble, think about what one of those ball-jointed dolls will look like and how the foot will look and move. I drew an example next to the leg.
Step 12
Now you can draw on the bottom two sides of the dress where the fabric connects and flows behind the legs. This gives depth to your dress and shows that it’s more than just a flat cardboard that is glued to her. You can perfect your drawing by adding rounded rectangles to show her shoelaces, eyebrows, and even a cute little turban on her head.
Step 13
Once done, you can delete any tutorial lines that might still be showing up and clean up everything that might look messy, and you’re done!


