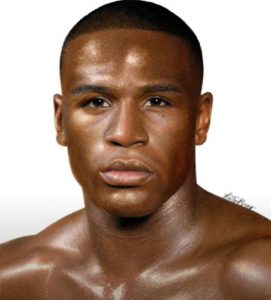
Floyd Mayweather drawing with colored pencil with this how-to video and step-by-step drawing instructions. Pencil drawing tutorial for beginners and everyone.

Please see the drawing tutorial in the video below
You can refer to the simple step-by-step drawing guide below
Step 1
Draw a light oval with a pencil number 2 or HB. Make sure you draw it as seen in the picture.
Step 2
Now draw straight lines to balance the features and curves on his face.
Step 3
Lightly outline the crescent lines for the hairline and head.
Step 4
You can draw in lines a. for eyebrows, b. for eyes, c. for the nose, d. for the mouth, e. for shoulder. Now let’s paint Floyd’s forehead, eyebrow and eye wrinkles.
Step 5
Observe where Floyd’s features appear in relation to the instructions. Draw on the nose and mouth. Draw in the profile of his jaw, ears and chin. Look closely at how his hairline appears in the tutorial. Remember, patience is your best friend because with it you will be able to finish your drawing.
Step 6
Draws on his neck, collarbone and part of his boxing gloves. This step is a bit challenging because of the folded details on the boxing gloves and the text on the gloves. Do not make these folds straight. Make them a little crooked. If you haven’t already, you can delete your guide now. Lines you cannot delete
Step 7
I made this drawing line especially for you if you don’t want to do the shading and pencil blending. If not, let’s continue to the pencil drawing section.
Step 8
Below is an outline made with a 0.7mm mechanical pencil. Look closely and see the shadow lines add to the shadows (they need to be very light). Your lines don’t need to be exactly the same as mine … just the same. Do not hesitate to delete some areas like
Step 9
I do not want to ignore this. The first photo shows how to hold your pencil for Overhand (great for writing & details) and Underhand (great for shading large areas in wide strokes). You can practice shading and go one step further with To
Step 10
This is how the stuff looked. I used a 0.7mm 2B mechanical pencil, a 9B pencil, paper towels, and a stump.
Step 11
This is the first start. This is where you will outline in small circles or lines to shade the areas. It will take hours to cover all those areas with a pencil. I choose colors with pastels. In a few strokes I had coverage. Apply
Step 12
I used my 9B pencil to shaded areas on his face, full of his hair (circular motion). I took out my kneading eraser and highlighted the highlights on his face.
Step 13
Drawing like this is a gradual accumulation. I keep sketching, mixing and sketching some more. This time, I first blended the pencil sketches with my toritllon for a smooth transition. I added lots of dark tones and details to his hair (in a circular motion), face, chest and boxing gloves with a 9B graphite pencil. I identified more prominent areas on my gloves. I also took a soft tissue to lighten his skin around the highlights.
Step 14
I smoothed his face, neck, body and gloves by blurring with my digital show. I also defined my lips and ears more by adding shadows and fixing highlights by looking at the reference image. All this was done in my drawing / digital program. Also a platform has been added. I am closing now. I hope you enjoyed this tutorial about Floyd Mayweather, a five-class world champion, who has won eight world titles and the Lineal championship in three different weight classes. All of you are great and it was fun to make this tutorial with you.


