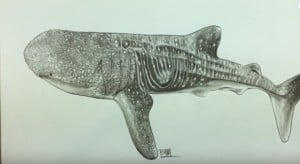
How to Draw a Whale Shark step by step easy with this how-to video and step-by-step drawing instructions. Easy animals to draw for children and evryone.

Please see the drawing tutorial in the video below
You can refer to the simple step-by-step drawing guide below
Step 1
To draw a Shark Whale, start with the head. It must be two curves that meet at the right, with a few collisions to imply a mouth. The top line must be flat, except on the back and front. The bottom line will be a coordinated curve, before obliquely to make the mouth.
Step 2
Now add a mouth with a long and thin drop of water. Place in a line just above the right of the mouth to make the nostrils, and a curve just behind the left of the mouth to add details to it. Place a dot behind the mouth to make the eye.
Step 3
Next we draw the fins. The first is higher than the second and is drawn by two sides of the triangle. A short line is placed after the first fin, before creating the smaller one. Do this with a small hump with a straight line on the left. Make another small line then draw the rest of the animal’s back.
Step 4
Now for big fins, bottom. This can be drawn with two lines starting very close together, and leaning towards the back, getting a bit closer as they go. The head should be slightly rounded, implying a sleek shape
Step 5
The smaller fins are drawn like peaks. After a small curve back to make part of the abdomen, make the two sides of a triangle point down. Then, add a small stream to make the rest of the body.
Step 6
Now dorsal fins are only four long lines. People will lean back and forth, before connecting with others obliquely and to the right. The other will go mostly down, but slightly right, before the last line connects the whole shape to the rest of the body.
Step 7
The shark has a neat line shape on its body. Draw a few lines on the back, as well as a straight line from the back corner of the mouth down a point right to the big finline to add texture detail to your animal, and you’re done! You have a whale!


